CloudZH documentation
Everything you need to install CloudZH, set up your media apps, invite friends and keep the server healthy.
What CloudZH is
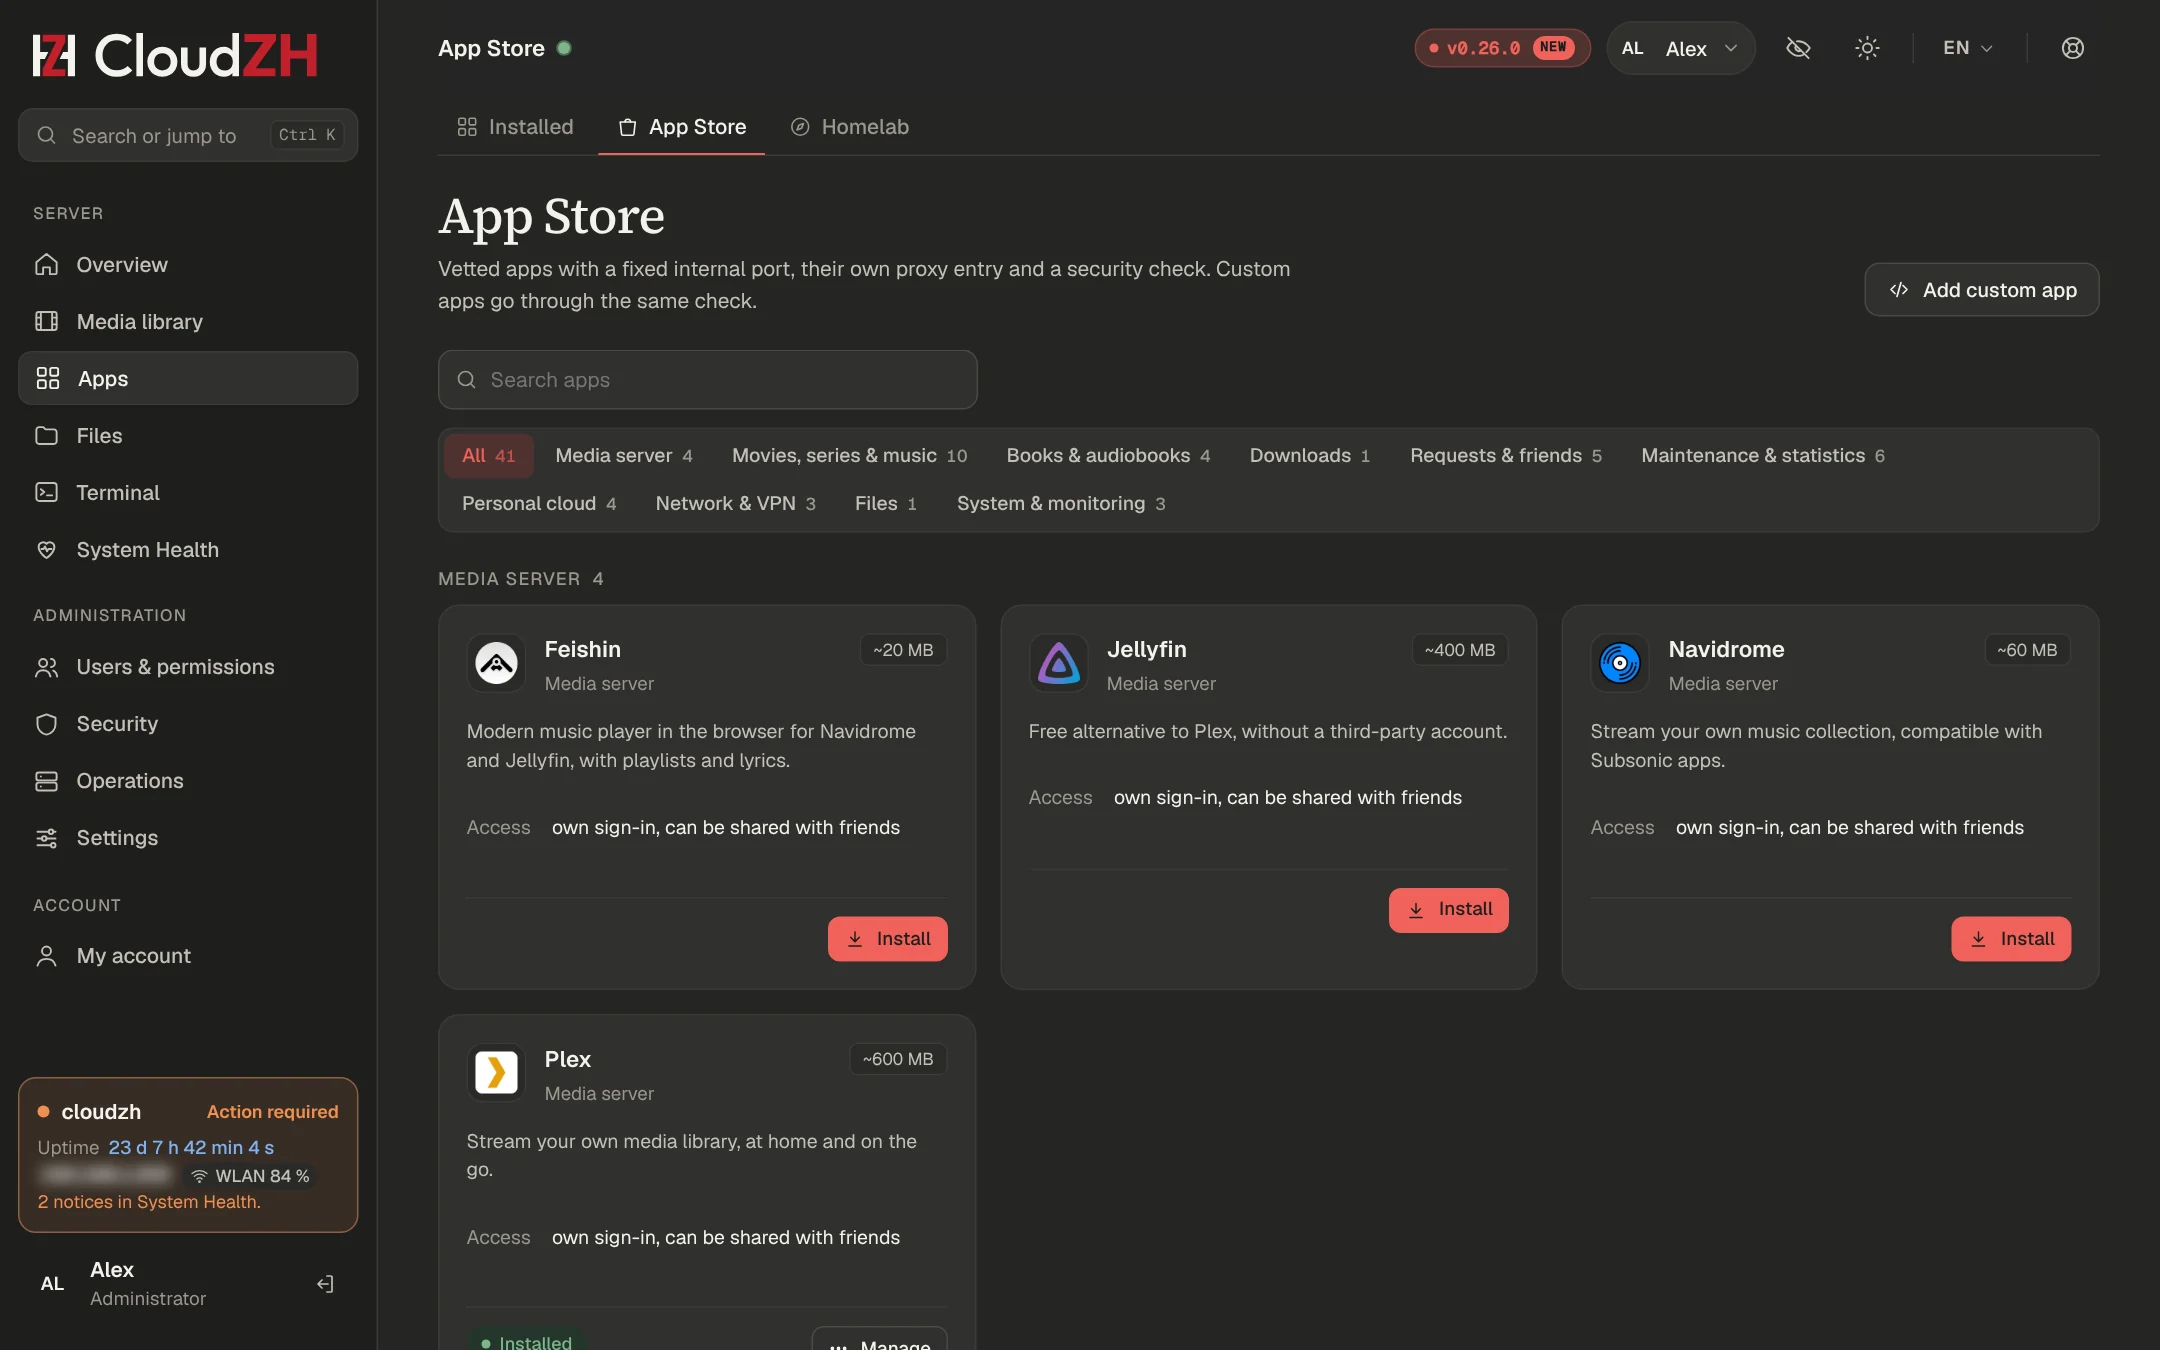
CloudZH turns a Linux machine at home (Ubuntu, Debian or Raspberry Pi OS) into a managed server. It brings a web dashboard, an App Store with 41 apps, a media library for your friends, a WireGuard VPN, health checks with safe repairs, and the zh command on the server.
How it is built
| Part | What it does |
|---|
| Caddy | The only entry point. HTTPS for every subdomain with one wildcard certificate. Admin apps are only reachable after the dashboard login. |
| Dashboard | The web interface. Runs without privileges in a hardened container. |
| Agent | A small root service with a fixed list of commands, reached over a Unix socket. Installs apps, runs repairs, reads logs. |
| Apps | Docker Compose, one folder per app under /opt/cloudzh/apps, data under /srv/data. |
| Native parts | WireGuard and UniFi OS Server run outside Docker. They are installed with zh on the server only. |
What CloudZH does not include
No media, no indexers and no torrent clients. You bring a Usenet provider and indexers of your choice, and use the apps with content you have the right to use.
Placeholders
Commands and addresses in this documentation use placeholders. Replace them, angle brackets included, with your own values.
| Placeholder | Stands for | Example |
|---|
<user> | The Linux user you created while installing Ubuntu | anna |
<server-ip> | The address of the server in your home network. On the server, ip -4 -br addr shows it in the line of the network adapter, before the /. Your router lists it among its devices too. | 192.168.1.200 |
example.com | Your own domain. app.example.com means app. followed by your domain. | app.example.com |
So ssh <user>@<server-ip> becomes, for example, ssh anna@192.168.1.200.
Requirements
What the machine, your network and your domain need before you run the installer.
Server
- Operating system: Ubuntu Server 24.04 LTS, 64-bit Intel or AMD (x86-64). Start from a fresh installation.
- Processor and memory: at least 4 cores and 8 GB, 16 GB if UniFi OS Server runs too. Plan more for Immich, Tdarr or many users streaming at once.
- Disks: an SSD for the system, and a separate disk or NVMe for your media, mounted at
/srv/data.
- Access: a user with
sudo rights and SSH.
Network
- Connect the server by cable. Wi-Fi works, but downloads, Plex and the VPN all suffer, and a UniFi controller must never depend on its own access point.
- Give the server a fixed address in your router (DHCP reservation), for example
192.168.1.200. The docs call it <server-ip>, see Prepare the server.
- With a domain, forward TCP 443 from your router to the server. For the VPN, also UDP 51820.
Domain
Optional. Without a domain, CloudZH runs in LAN mode, only in your home network. See Domain or home network.
- A domain whose DNS zone is managed by Cloudflare.
- A Cloudflare API token with the permission Zone · DNS · Edit for this zone. Do not use the Global API Key.
Licence
- A licence key (
CZL-XXXXX-XXXXX-XXXXX-XXXXX) and an installation key (CZI-XXXXX-XXXXX-XXXXX) from your licence email. The installation key works for one server and only until the date in the email.
Optional accounts
- A Plex account, a Usenet provider and at least one Usenet indexer.
- An API key from an AI provider if you want to use the assistant.
Installation
About 15 minutes from a fresh Ubuntu to the first login.
First time?The Customer guide explains every step, from your account and licence email to Ubuntu and the first login.
<user> is the Linux user you created while installing Ubuntu, <server-ip> the address of the server in your home network, for example 192.168.1.200. On the server, ip -4 -br addr shows it in the line of the network adapter. More in Placeholders.
Update Ubuntu
sudo apt update && sudo apt full-upgrade -y
sudo reboot
Copy the installer to the server
Download the installer in your customer account under My licences → Download installer, a file named like cloudzh-0.35.0-stable-customer.tar.gz. The page also shows its SHA-256 checksum. Copy it over from your computer, then unpack it on the server. <file> is the name of the installer file:
scp <file> <user>@<server-ip>:~
ssh <user>@<server-ip>
mkdir -p ~/cloudzh && tar xzf ~/<file> -C ~/cloudzh --strip-components=1
cd ~/cloudzh
Run the installer
The installer asks for your domain (leave it empty for LAN mode), the Cloudflare token, your licence key and the installation key. To pass the keys without questions:
sudo CZH_LICENSE_KEY=CZL-XXXXX-XXXXX-XXXXX-XXXXX \
     CZH_INSTALL_KEY=CZI-XXXXX-XXXXX-XXXXX bash install.sh
At the end it prints the dashboard address, a setup token and, on a new server, where the backup key is. Save the backup key in your password manager; without it, backups cannot be opened:
sudo cat /etc/cloudzh/backup.key
Sign in and check
Open the dashboard address, enter the setup token and create your administrator. Lost the token? zh token shows it again. Then, on the server:
Continue with Domain & HTTPS and First steps.
What the installer sets up
- Docker, Caddy, the dashboard and the agent as systemd services
- The data tree under
/srv/data (see Data layout)
- Fail2Ban and the SSH greeting with a short status
- The diagnostics kit: speed test,
mtr, iperf3, dig, smartctl, sensors, ethtool, iw, htop, ncdu
- The
zh command for every user with sudo rights
Already installed?Activate a licence on an existing server with zh license activate or in the dashboard under My account → Subscription.
Domain & HTTPS
CloudZH gives every app its own HTTPS address under your domain, with one wildcard certificate.
On this page example.com stands for your own domain and <server-ip> for the address of the server at home, for example 192.168.1.200. No domain? Then CloudZH runs in LAN mode, see Domain or home network.
DNS records
Create one wildcard record that points to your public IP address. Your root domain and mail can stay where they are.
| Type | Name | Value | Proxy |
|---|
| A | * | your public IP | DNS only |
Your public IP: on the server, curl -4 -s https://ifconfig.me.
Addresses you get
| Address | Use |
|---|
app.example.com | Dashboard. The installer asks for the subdomain and suggests dash. |
plex.example.com | Plex, for apps and friends outside your home |
sonarr.example.com and others | Admin apps, behind the dashboard login |
vpn.example.com | WireGuard endpoint. Must point straight to your IP, never through the Cloudflare proxy. |
Your main domain
Without further setup, example.com itself forwards to the dashboard, and it may as well keep pointing to your existing website or mail host. To serve a static website from the server instead, point the root record to your IP and publish a folder with an index.html:
zh website deploy /home/<user>/my-site
zh website on
zh website status   # shows whether the DNS records already point here
www.example.com then forwards to example.com, and zh website rollback brings back the previous version.
Certificate
Caddy requests the wildcard certificate through Cloudflare's DNS check (DNS-01), so no port 80 is needed. Enter your API token when the installer asks for it; zh cloudflare-token checks and replaces it later. System Health shows when the certificate is valid.
Inside your home network
From home, app.example.com resolves to your public IP and travels through the router and back. Many routers handle this slowly. Add a hosts entry on your computer so it goes straight to the server:
<server-ip> app.example.com
For example 192.168.1.200 app.example.com. Windows: C:\Windows\System32\drivers\etc\hosts. macOS and Linux: /etc/hosts. The performance diagnosis tells you when this applies.
First steps
This order lets the auto-wiring do most of the work.
Secure your account. My account → Sign-in: add a passkey or an authenticator app, and save the recovery codes.
Install the download side. App Store: SABnzbd (the form asks for your Usenet server), then Prowlarr, Radarr and Sonarr.
Add indexers in Prowlarr only. Prowlarr syncs them to Radarr and Sonarr. See
Media library.
Install Plex with the wizard. Click
Connect with Plex, choose libraries and language. See
Setup wizards.
Connect the apps. Apps → Connect apps, or zh apps wire.
Apply the TRaSH recommendations. Apps → TRaSH recommendations, then Media library → Quality.
Set up the VPN. zh vpn install, forward UDP 51820,
zh vpn add phone. See
VPN.
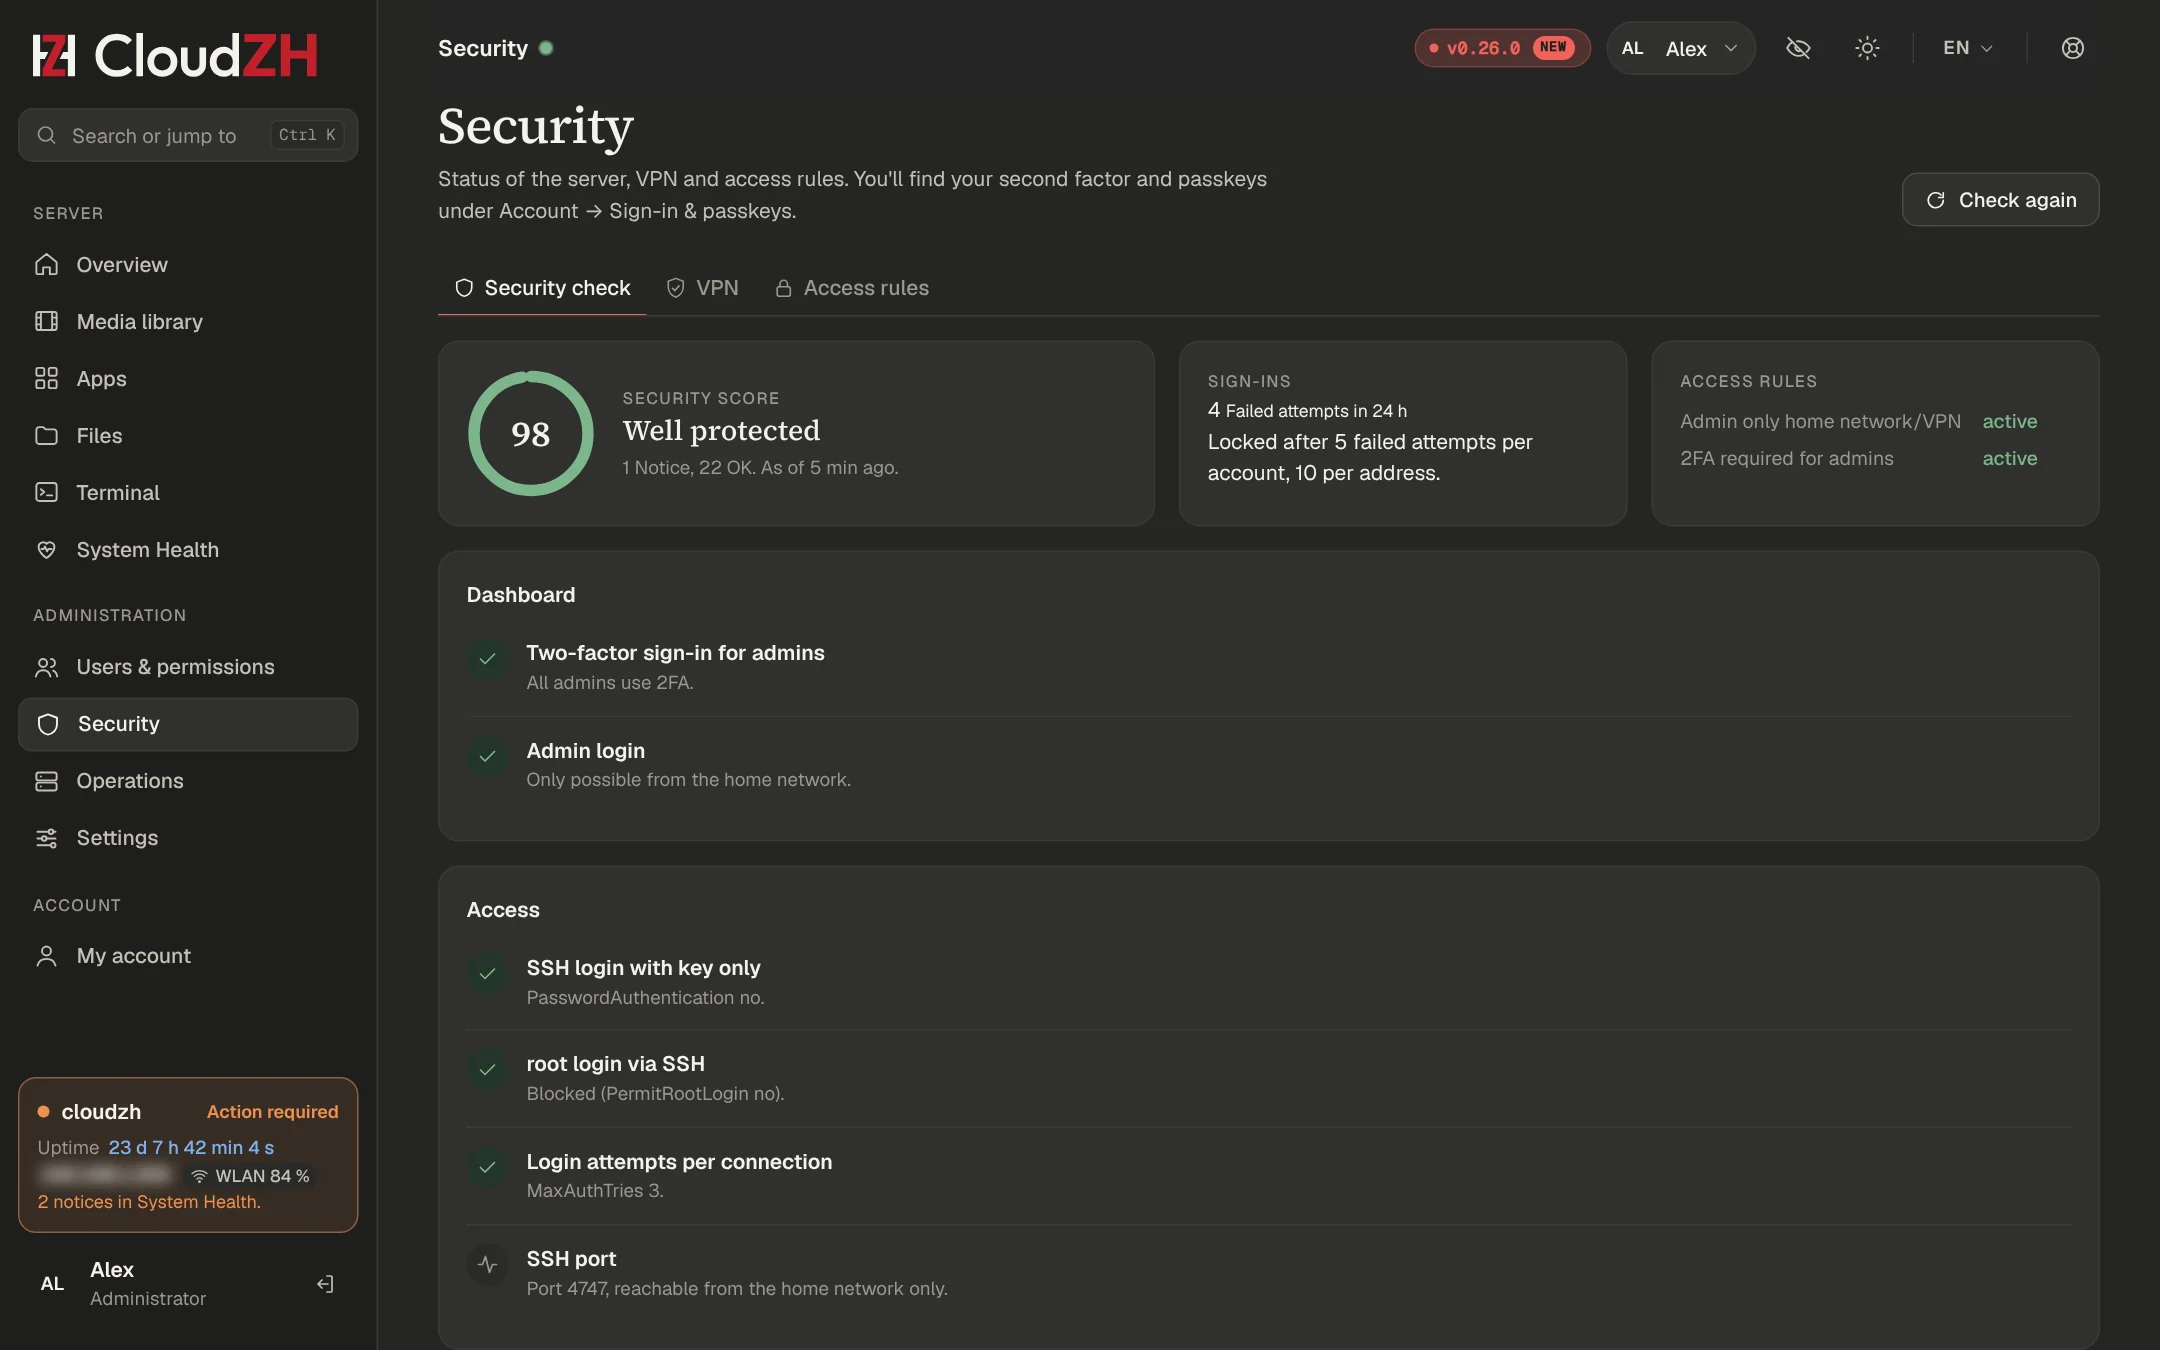
Turn on access rules. Security: admin access only from home and VPN, 2FA required.
Invite friends. Users & permissions → Invitations.
Customer guide
From your account to a running server
Ten short steps for everyone who bought CloudZH or wants to try it. No prior knowledge needed: each step says what to click and what to type.
1. Create your accountAt account.cloudzh.app, protected by a passkey or two-factor sign-in.
2. Get a licenceRedeem a trial code or buy a subscription.
3. Your licence emailWhat the two keys are for, and why you keep the email.
4. Prepare the serverHardware, Ubuntu and a fixed address at home.
5. Domain or home networkHTTPS from anywhere, or LAN mode at home only.
6. Install CloudZHRun the installer, enter your keys, sign in.
7. Everyday useApps, friends, backups, updates, System Health.
8. Move or reinstallRelease a server, new keys, a lost licence key.
9. Subscription & invoicesChange or cancel, download invoices.
10. Get helpSupport requests, Discord and zh doctor.
What you need
- An email address you can read on your computer.
- A machine for the server: 64-bit Intel or AMD with at least 4 cores and 8 GB of memory, see step 4.
- A second computer (Windows, macOS or Linux) to download files and type commands.
- Access to your router, to give the server a fixed address.
- Optional: your own domain with DNS at Cloudflare, for access from outside your home.
Placeholders
Commands use placeholders. Replace them, angle brackets included, with your own values.
| Placeholder | Stands for | Example |
|---|
<user> | The Linux user you create while installing Ubuntu | anna |
<server-ip> | The address of the server in your home network. Step 4 shows how to find it. | 192.168.1.200 |
example.com | Your own domain, if you use one | app.example.com |
Step 1 of 10
Create your account
Your account at account.cloudzh.app holds your licences, servers, invoices and support requests.
Sign up
Open account.cloudzh.app and click Create one below the sign-in form.
Enter your name and email address, accept the terms and wait until the security check has passed. Click Create account.
Open the email Confirm your email address and click Confirm email. The link is valid for 24 hours. Nothing there? Check your spam folder. When you try to sign in, CloudZH also offers Send the confirmation link again.
Set your password: at least 10 characters. A sentence of several words is safe and easy to remember. Click Save and sign in.
Bought CloudZH before you had an account? Sign up with the email address you used at checkout. Your licences then appear in your account, and you get an email that they were linked.
Protect your account
Whoever signs in to your account can order new keys for your licence. Add a second factor under Security:
| Option | How |
|---|
| Passkey (recommended) | Passkeys → Add. You then sign in with the fingerprint, face or PIN of your device. |
| Authenticator app | Two-factor (app) → Set up. Scan the QR code with an app such as Google Authenticator, 1Password or Bitwarden and enter the 6-digit code. |
CloudZH then shows recovery codes. Each one works once if you lose your phone or passkey. Keep them in your password manager.
The menu
| Page | What you do there |
|---|
| Overview | Active licences, servers and open requests at a glance |
| Licences → My licences | Licences, servers, installation keys; release a server, reissue a licence key |
| Licences → Buy | Buy a subscription |
| Licences → Redeem code | Trial, gift and promotion codes |
| Account → Invoices | Invoices, and the way to manage your subscription |
| Account → Security | Passkeys, two-factor, password, name, signed-in devices, recent events, delete account |
| Help → My requests | Your support requests; a counter shows new replies |
| Help → Discord | The CloudZH community |
Your email address can only be changed through support.
Step 2 of 10
Get a licence
One licence covers one server, as Standard (one dashboard account) or Pro (every feature, accounts for family and friends). Start with a free trial or buy a subscription.
Redeem a trial or gift code
Open the link you received, for example https://account.cloudzh.app/redeem/<CODE>, or go to Redeem code in your account and type the code.
Below the field CloudZH shows what the code gives you, for example Trial for 30 days, 1 server(s). Click Redeem.
Your licence is ready: the licence appears under My licences, and the keys arrive by email within minutes.
Not signed in yet? The link asks you to sign in or create an account first. If the code is no longer filled in after you confirmed your email, open the link again or type it under Redeem code.
- A trial licence covers one server and ends by itself. There is one trial per account and one per machine.
- Some codes extend a licence you already have. CloudZH asks which one.
- Discount codes for a subscription do not go here. Enter them on the payment page.
Buy a subscription
Click Buy in your account.
Choose Monthly or Yearly and the number of servers. Each server needs its own licence.
Click Continue to payment. Payment runs on Stripe; the seller is Link (Sold through Link, LLC, a Stripe company), and taxes are calculated for your country.
After paying you are back under My licences. The licence appears within seconds, the keys arrive by email.
You can also buy under Pricing on this website without an account. The keys then go to the email address you enter at checkout. Create your account later with the same address to see the licence there.
Already have an account?Then buy under Buy. The licence lands in your account right away.
Step 3 of 10
Your licence email
Your keys never appear in your account. The licence service emails them from support@cloudzh.app, usually within minutes.
What is in it
| Line | Example | Meaning |
|---|
| Plan | Monthly, 1 server | Subscription or trial, and the number of servers |
| Paid until or Valid until | 8 Nov 2026 | The licence runs until this date. Subscriptions renew automatically. |
| Licence key | CZL-XXXXX-XXXXX-XXXXX-XXXXX | Your licence. It stays the same for years, and every server asks for it. |
| Installation key | CZI-XXXXX-XXXXX-XXXXX | A one-time ticket for exactly one server, valid until the date next to it. One per server. |
Why two keys: someone who sees your licence key on a screenshot still cannot activate a server without a fresh installation key from your account.
Which emails you get
| Subject | When | Contains |
|---|
| Your CloudZH licence | After a purchase | Licence key, one installation key per server (valid 30 days), how to install, how to manage the subscription |
| Your CloudZH licence is ready | After redeeming a code | Licence key and one installation key |
| Your new installation key | After Create installation key | One installation key, valid 7 days |
| Your new licence key | After Reissue licence key | The new licence key; the old one stops working |
| Additional CloudZH installation keys | After you add servers to your subscription | Installation keys for the extra servers |
Keep this emailWe store only a fingerprint of your keys and cannot show them again. Keep the email, or copy the keys into your password manager. Lost the licence key? Reissue it in your account.
No email after a few minutes? Check your spam folder. Under My licences you can reissue the licence key and create an installation key; both arrive by email again.
The installer
The installer is a file named like cloudzh-0.35.0-stable-customer.tar.gz. Download it in your customer account under My licences → Download installer; the button is there as soon as you have a valid licence, from a purchase or a code. Next to it you find the SHA-256 checksum to verify the download (sha256sum <file> on Linux, Get-FileHash <file> in PowerShell).
Step 4 of 10
Prepare the server
A fresh Ubuntu Server, a fixed address in your home network and, ideally, a second disk for your media. About 30 minutes.
Hardware
- 64-bit Intel or AMD processor with at least 4 cores, for example a mini PC.
- 8 GB of memory, 16 GB if UniFi OS Server should run too.
- An SSD for the system, ideally a second disk for your media.
- A network cable to your router. Wi-Fi works, but downloads, Plex and the VPN suffer.
- A USB stick with at least 4 GB for the Ubuntu installer.
Install Ubuntu Server
Download
Ubuntu Server 24.04 LTS from
ubuntu.com/download/server and write it to the USB stick with Rufus (Windows) or balenaEtcher.
In the BIOS, set After Power Loss to Power On, so the server starts by itself after a power cut.
Start the server from the stick and choose:
| Screen | Choice |
|---|
| Language | English |
| Keyboard | Your keyboard layout |
| Type of install | Ubuntu Server, not "minimized" |
| Network | Network cable, address by DHCP for now |
| Storage | The whole system SSD. Clear Set up this disk as an LVM group, no encryption. Do not select the media disk. |
| Profile | A server name in lower case, for example mediaserver. Your username becomes <user>. A strong password. |
| Ubuntu Pro | Skip for now |
| SSH | Tick Install OpenSSH server |
| Featured snaps | Select nothing, not even Docker |
After the restart, sign in on the server as
<user>, set your time zone and update:
sudo timedatectl set-timezone Europe/Zurich   # your zone; list: timedatectl list-timezones
sudo apt update && sudo apt full-upgrade -y
sudo reboot
Give the server a fixed address
Your router hands out addresses. Reserve one for the server so it never changes.
On the server, show the address and the MAC address of the network adapter:
ip -4 -br addr
ip -br link
Look at the line of your network adapter: its name usually starts with en or eth (Wi-Fi with wl); ignore lo. Example: enp3s0 UP 192.168.1.200/24. The address before the / is your <server-ip>, here 192.168.1.200. In the output of ip -br link, the MAC address looks like aa:bb:cc:dd:ee:ff.
In your router, create a DHCP reservation for this MAC address, sometimes called fixed or static IP. Your router also lists the server among its devices with this address. Then restart the server with sudo reboot.
From now on, work from your computer. Open a terminal (Windows: PowerShell) and connect:
For example ssh anna@192.168.1.200. The first time, answer yes, then enter the password of <user>.
Never forward SSHDo not forward SSH in your router. You only need it inside your home network.
Second disk for media
Optional, but recommended. CloudZH keeps media and downloads in /srv/data; mount the media disk there before you install. Show the disks:
New, empty disk: format it. This erases everything on the disk, so check the device name twice. /dev/nvme0n1 is an example:
sudo wipefs -a /dev/nvme0n1
sudo mkfs.ext4 -L cloudzh-data /dev/nvme0n1
Disk that already holds media: only set the label, for example sudo e2label /dev/nvme0n1p1 cloudzh-data.
Then mount it, now and after every restart:
sudo mkdir -p /srv/data
grep -q 'LABEL=cloudzh-data' /etc/fstab || echo 'LABEL=cloudzh-data /srv/data ext4 defaults,noatime 0 2' | sudo tee -a /etc/fstab
sudo findmnt --verify
sudo systemctl daemon-reload && sudo mount -a
df -h /srv/data
Existing films and series belong in /srv/data/media/movies and /srv/data/media/tv.
Step 5 of 10
Domain or home network
Decide before you install: HTTPS from anywhere with your own domain, or LAN mode in your home network only.
| Domain mode | LAN mode |
|---|
| Dashboard | https://app.example.com, from anywhere | http://<server-ip>, at home only |
| Apps | Each with its own HTTPS address, for example plex.example.com | Server address and the app's usual port |
| Passkeys | Yes | No, they need HTTPS on your own domain |
| You need | A domain with DNS at Cloudflare (the free plan is enough) and access to your router | Nothing else |
example.com stands for your own domain, <server-ip> for the address of the server at home, for example 192.168.1.200.
Prepare domain mode
Create a Cloudflare API token. Cloudflare → My Profile → API Tokens → Create Token → template Edit zone DNS → Zone Resources: Include, Specific zone, your domain → Create Token. Copy the token; the installer asks for it. Use an API token, never the Global API Key, and never paste it into chats or emails.
Add one DNS record. Cloudflare → your domain → DNS → Records:
| Type | Name | Value | Proxy |
|---|
| A | * | your public IP | DNS only (grey cloud) |
Leave existing records for your website or mail as they are. Your public IP: on the server,
curl -4 -s https://ifconfig.me. If it changes now and then, you also need a dynamic DNS service.
Forward a port in your router. TCP 443 to <server-ip>, for dashboard, apps and Plex. For the VPN later, also UDP 51820. Nothing else.
More on addresses, the certificate and the hosts entry for faster access at home: Domain & HTTPS.
LAN mode
Leave the domain empty when the installer asks for it. The dashboard then opens at http://<server-ip> in your home network.
To switch to a domain later, prepare it as above and run the installer again in its folder (cd ~/cloudzh && sudo bash install.sh). It asks whether to set up again; users and apps stay.
Step 6 of 10
Install CloudZH
Copy the installer to the server, run it and enter your two keys. The installer itself takes 5 to 10 minutes.
You need the installer file from My licences → Download installer in your customer account and your licence email. <user> and <server-ip> are from step 4; <file> is the name of the installer file, for example cloudzh-0.35.0-stable-customer.tar.gz.
Copy the installer to the server
On your computer, in the folder with the installer (Windows: PowerShell, for example after cd Downloads):
scp <file> <user>@<server-ip>:~
Unpack and start it
ssh <user>@<server-ip>
mkdir -p ~/cloudzh && tar xzf ~/<file> -C ~/cloudzh --strip-components=1
cd ~/cloudzh && sudo bash install.sh
sudo asks for the password of <user>.
Answer the questions
| Question | Answer |
|---|
| Domain (leave empty for LAN mode) | Your domain, or empty for LAN mode |
| Subdomain for the dashboard | For example app; Enter keeps dash |
| Email for Let's Encrypt | Your email address |
| Cloudflare-API-Token | Paste the token. It stays invisible while you type; the installer checks it with Cloudflare. |
| Central data folder | Enter, for /srv/data |
| License key (CZL-…) | The licence key from your email |
| Installation key (CZI-…) | One installation key from your email |
Subdomain, email and Cloudflare token are asked only in domain mode. Leave the licence key empty to activate later with zh license activate; until then CloudZH runs in restricted mode.
Save the backup key
At the end the installer shows the dashboard address and a setup token. Copy the backup key into your password manager; without it, backups cannot be opened:
sudo cat /etc/cloudzh/backup.key
Did /srv/data already hold media? Then also run sudo chown -R cloudzh:cloudzh /srv/data.
Sign in for the first time
Open the dashboard address: https://app.example.com with a domain, http://<server-ip> in LAN mode. Enter the setup token and create your administrator. Lost the token? zh token shows it again.
Check
Sign out of SSH and back in once, then:
My account → Subscription in the dashboard shows the licence of this server.
Step 7 of 10
Everyday use
What you do once CloudZH runs. Each part links to the page with all details.
Secure your sign-in
My account → Sign-in: add a passkey or an authenticator app and save the recovery codes. Once the VPN works, allow admin access only from home and VPN under Security.
Install apps
Open the App Store, choose an app and click Install. A good order: SABnzbd, Prowlarr, Radarr and Sonarr, then Plex with its wizard. CloudZH connects them for you. See First steps and Apps & App Store.
Invite friends
Users & permissions → Invitations → Invite. Choose rights and apps, how long the link is valid (1 to 30 days) and how many accounts it may create, then send the link. It is shown only once. See Friends & permissions.
Backups
Operations → Backups → Back up now, or on the server:
Keep a copy on another machine, and the backup key in your password manager. Your media is not part of the backup.
Updates
A new CloudZH version shows under Needs attention on the overview. Click Update, or on the server:
Settings → Updates shows whether updates are set up on your server. Got a new version as an installer archive instead? Unpack it and run zh upgrade, see Backups & updates. Each app page has its own Update for the app.
System Health
System Health checks the whole server. Red means a problem, yellow a notice. Safe cases are repaired automatically; most other findings have a button that fixes them. On the server:
zh doctor         # check
zh doctor --fix   # check and run safe repairs
See System Health.
Step 8 of 10
Move or reinstall a server
A licence counts active servers. Free the seat of the old server, then activate the new one with a fresh installation key.
New hardware or a fresh Ubuntu
Release the old server. In your account: My licences → Servers → Release. Or on the old server with zh license release, or in its dashboard under My account → Subscription → Release. The released server keeps its apps running, in restricted mode without updates.
Create an installation key. My licences → Create installation key. It arrives by email and is valid 7 days for exactly one server.
Set up the new server as in
steps 4 to 6, with your licence key and the new installation key.
CloudZH already installed and only needs a licence? Run zh license activate, or use My account → Subscription in the dashboard.
Create installation key stays greyed out while all seats are taken. Release a server first, or revoke an unused key under Open installation keys → Revoke.
Lost licence key
My licences → Reissue licence key.
Type the last 5 characters shown in the window and click Reissue.
The new licence key arrives by email.
The old licence key and all open installation keys stop working at once. Servers that are already active keep running. For a server you have not set up yet, create a new installation key.
Hardware changed without a release
If you move the system disk to other hardware, the server keeps running and shows Hardware changed. If two machines use the same licence, only one keeps it. Release the old server first to avoid that.
Step 9 of 10
Subscription & invoices
Link (Stripe) sells and manages your subscription. Your account shows the invoices.
Change or cancel
In your account: Invoices → Manage subscription → Open Link.
Sign in at Link with the email address you used to buy.
Change the payment method or the number of servers, or cancel.
More servers: the installation keys for them arrive by email. Fewer servers: release the servers you no longer use first.
After cancelling
The subscription runs to the end of the period you paid for and is not renewed. Then a grace period of 7 days follows, after that restricted mode: your apps, Plex, VPN and backups keep running; CloudZH updates, new apps and new users pause. See Licensing and the Refund Policy.
Payment due
If a payment fails, My licences shows Payment due. Check your payment method at Link; otherwise the server runs in restricted mode after the grace period.
Invoices
Invoices lists every invoice with number, date, amount and status. View opens it, PDF downloads it.
Delete your account
Security → Delete account, confirmed with your email address. Cancel running subscriptions at Link first. Invoices are kept as required by law.
Step 10 of 10
Get help
Most answers are on the server already. When they are not, write to us with the right details.
Check first
- System Health: is there a problem with a repair button?
- The assistant in the dashboard, if you set it up: ask what is wrong.
- This documentation: press Ctrl K and search.
zh status   # version, server, apps and licence
zh doctor   # all checks
Support request
In your account: My requests → New request.
Choose a topic, write a subject and describe what happened, what you tried and which CloudZH version runs. Attach up to 3 files of 5 MB each, for example screenshots or logs.
Click Send. You get an email when we reply; read and answer in your account, not by email.
No account? Use account.cloudzh.app/support. Confirm the request with the link in the email we send you; we only see it after that. You can also write to support@cloudzh.app.
Discord and feedback
Quick help from the community: Discord, also under Help in your account and with zh support on the server. In the dashboard, Help and feedback (the speech bubble at the top right) lets you request a feature or report a bug.
What to send
- CloudZH version and server (
zh status) - Output of
zh doctor - The text of the console or error, copied
- What you did and what you expected
Before you sendRemove API keys, passwords, licence keys and your public IP address from logs and screenshots.
Dashboard tour
Few menu entries, related pages as tabs, and the overview sorted by importance.
Sidebar
The sidebar has three groups that you can collapse: Server, Administration and Account. Related pages sit together as tabs:
| Entry | Tabs |
|---|
| Apps | Installed · App Store · Homelab |
| Operations | Services & features · Backups · Logs · Performance · Server commands |
| Settings | General · Appearance |
| My account | Profile · Sign-in · Devices · Subscription |
Overview
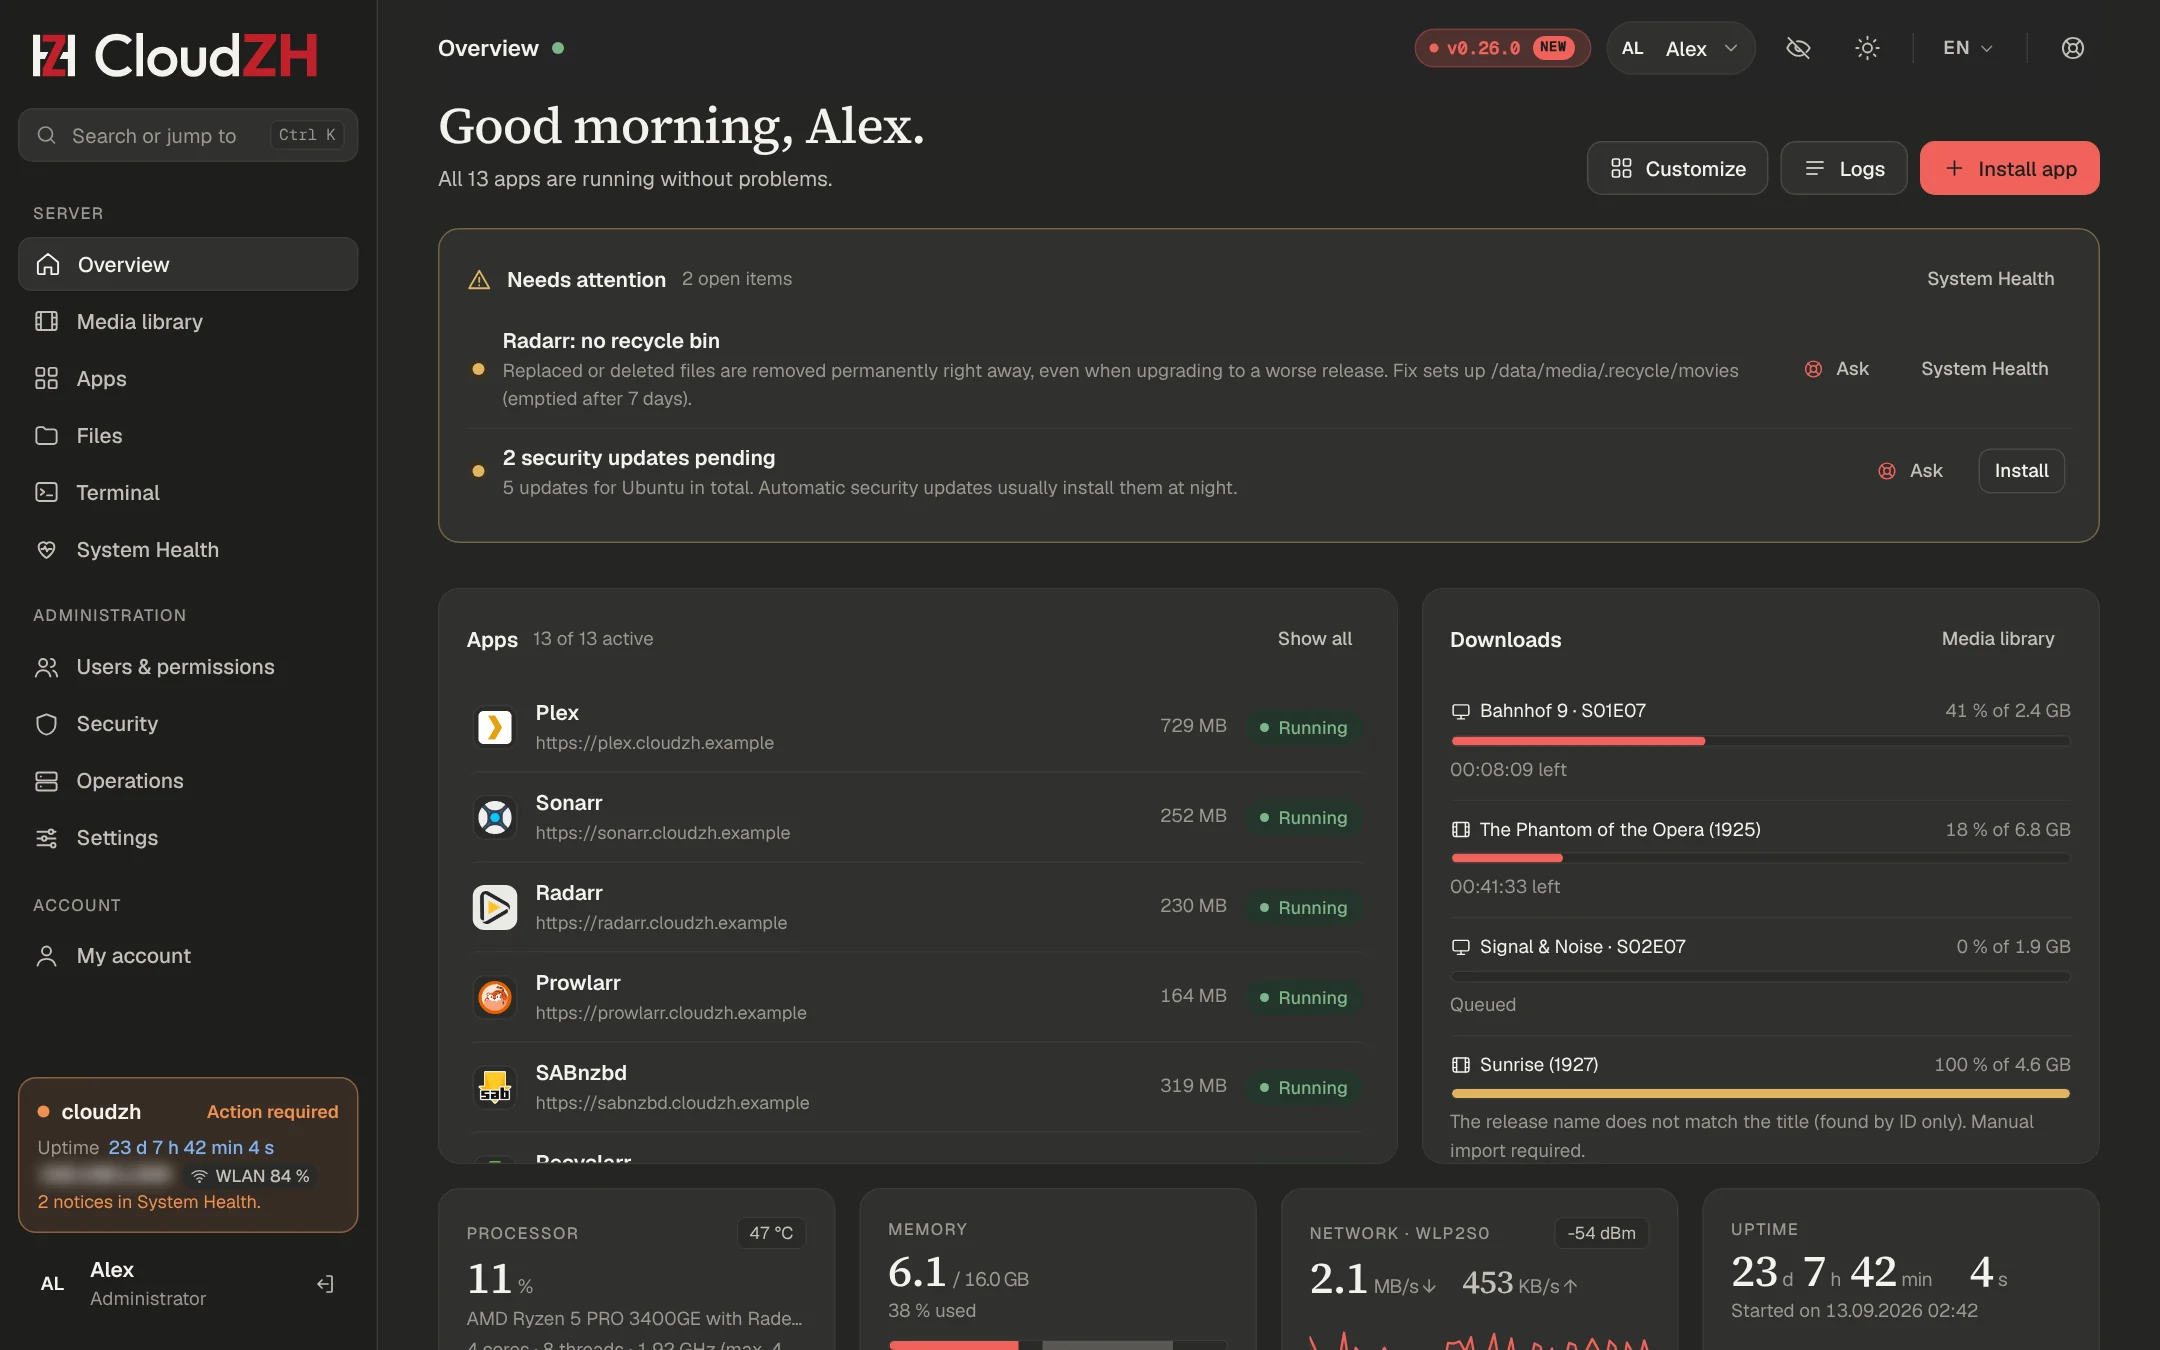
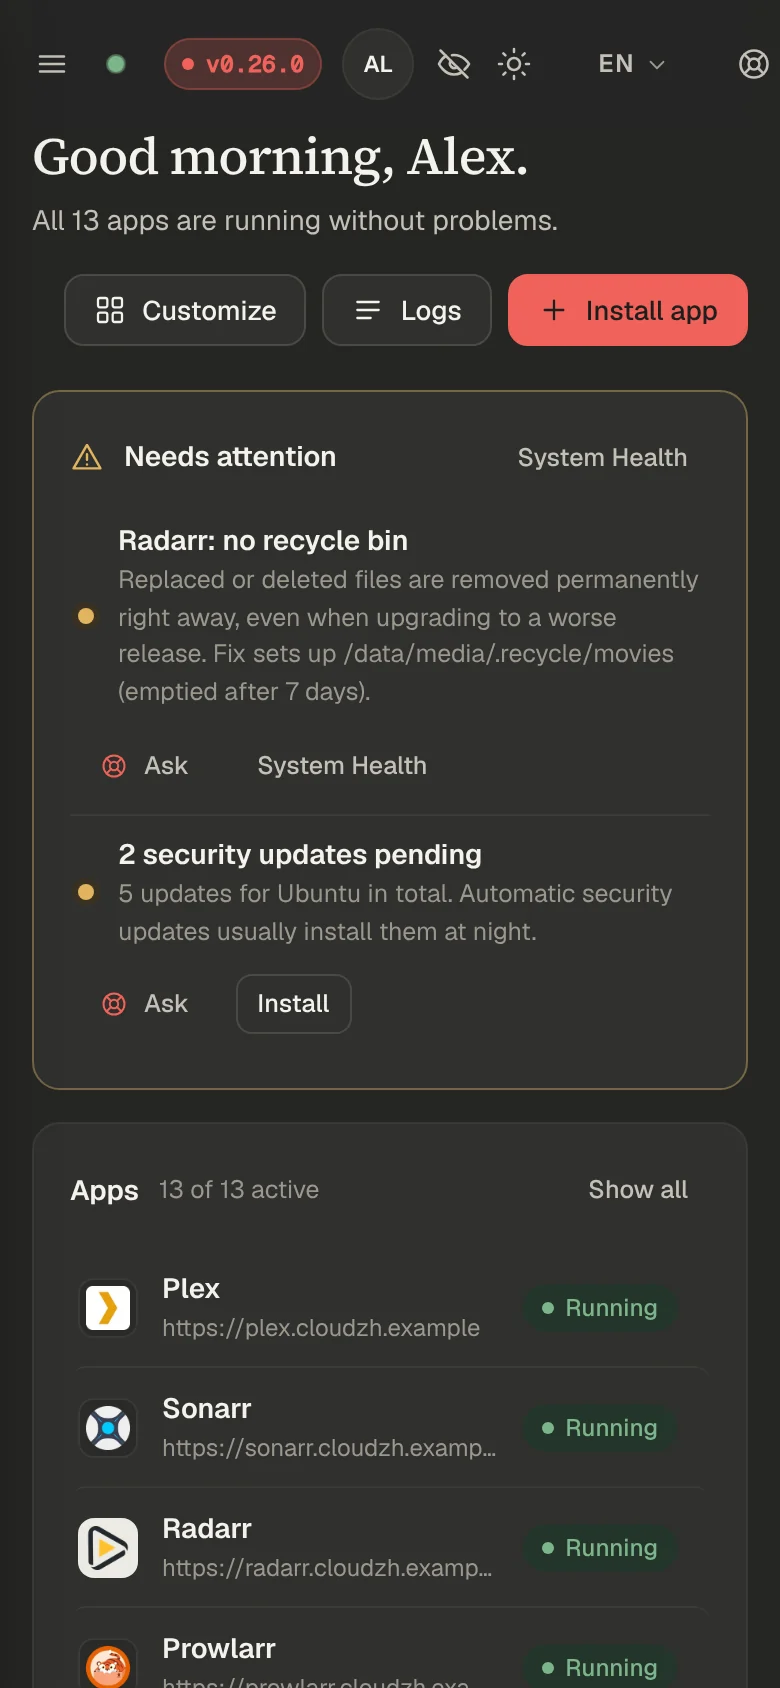
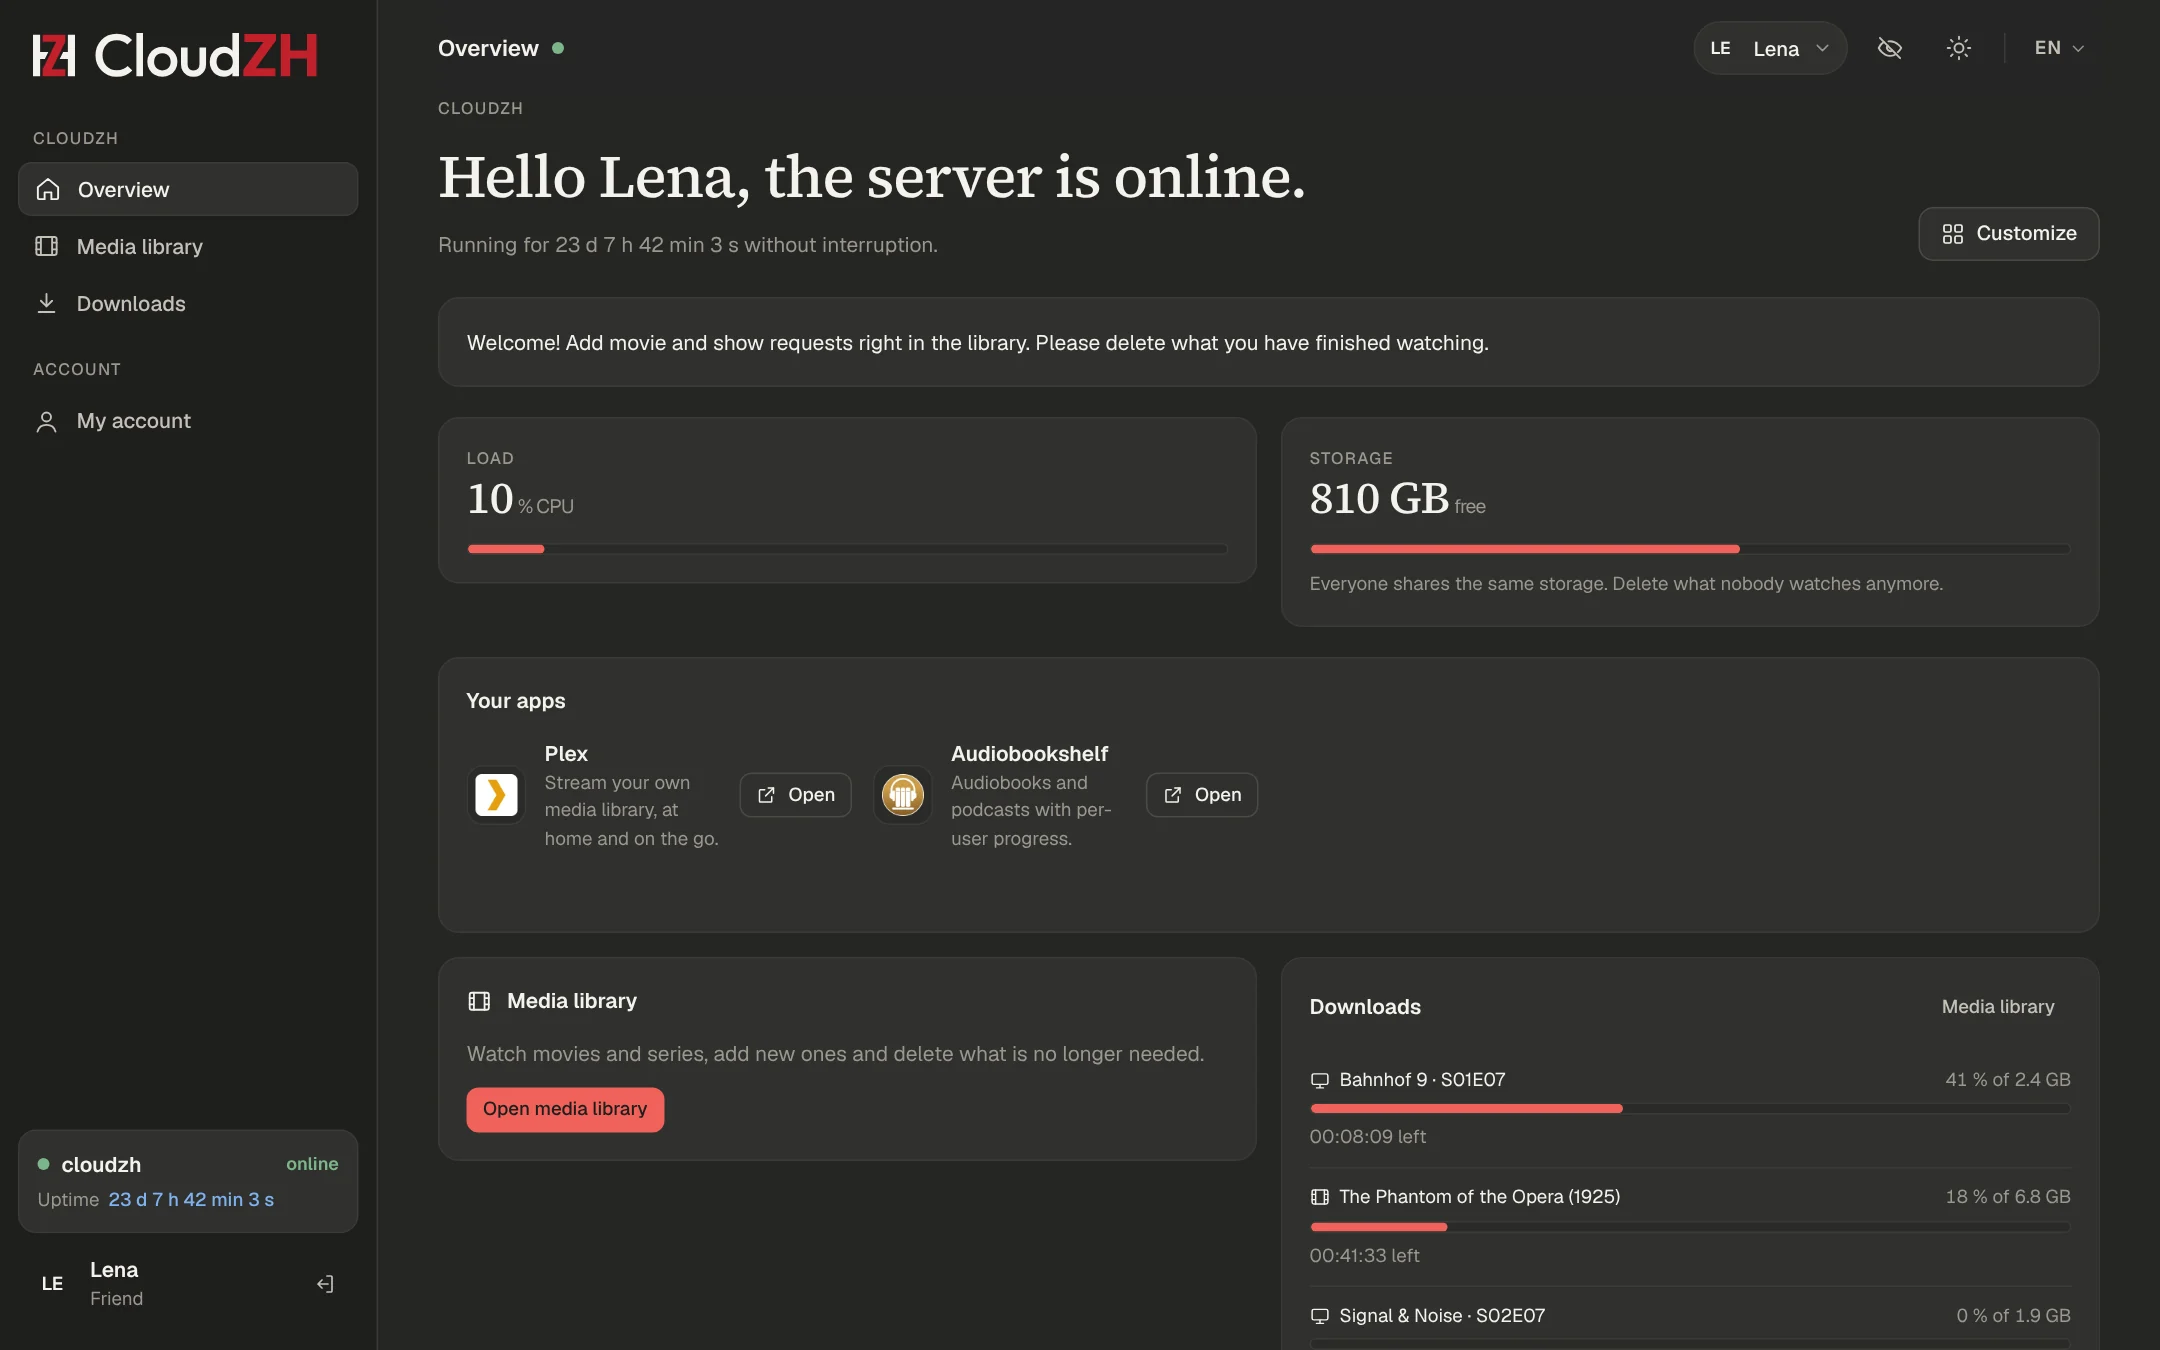
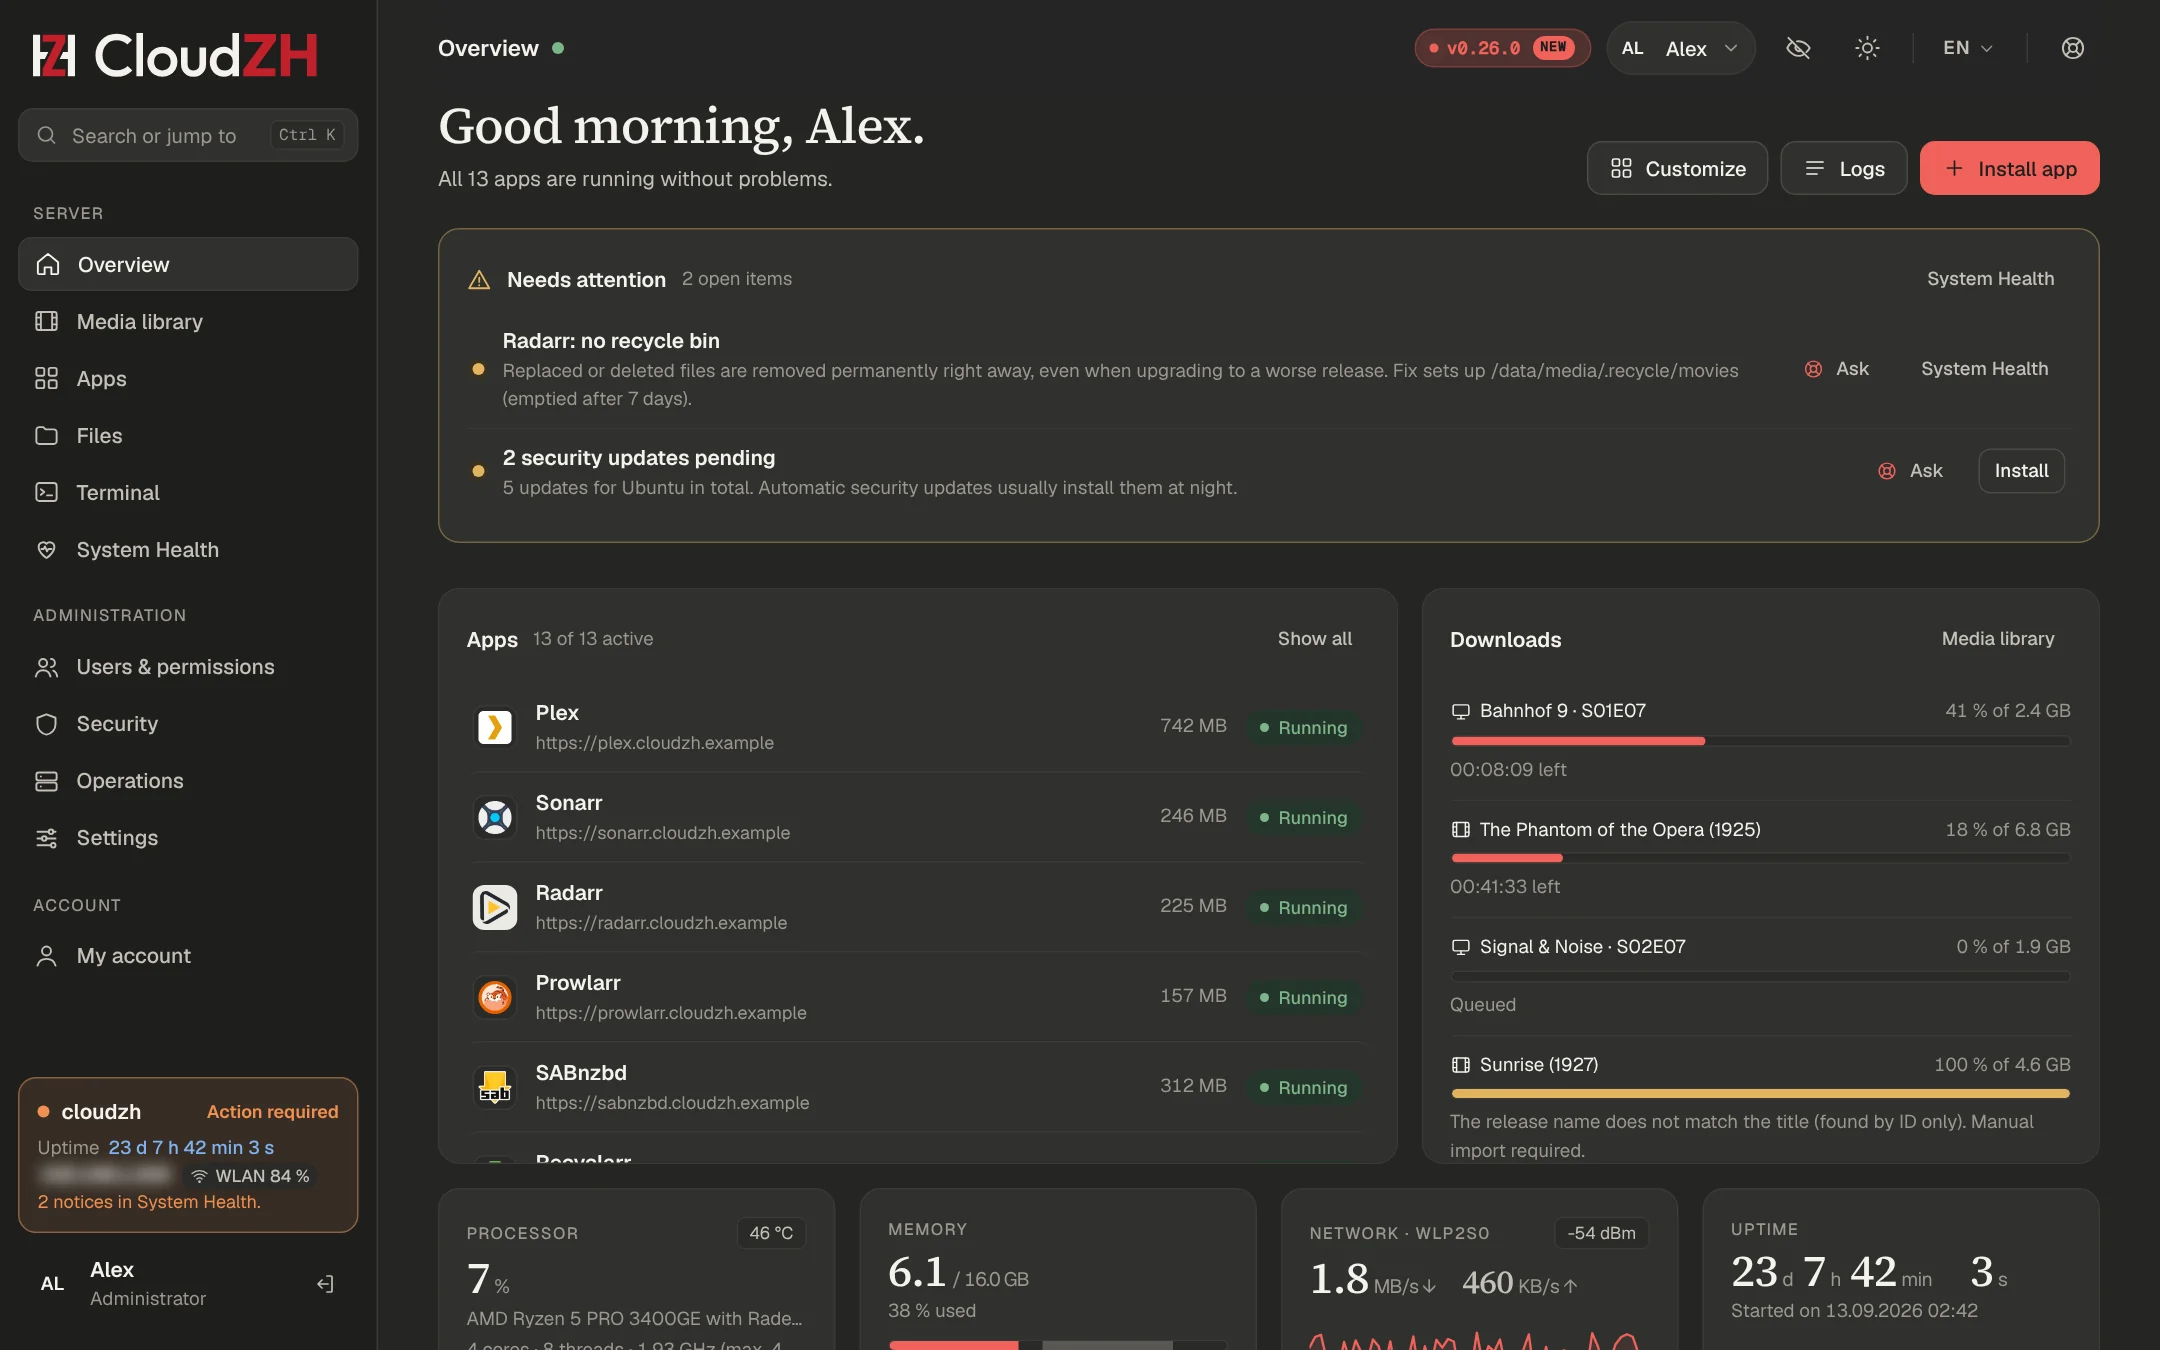
The overview is a grid of widgets. By default it shows Needs attention first, then Apps and Downloads, the figures for processor, memory, network and uptime, then Storage and Activity. Problems come before notices. Click Customize to arrange it your way, see Customizing.
Live updates
The green dot next to the page title means the page is live. Changes from another tab, your phone or the zh command appear without reloading. If you are typing in a form, CloudZH does not redraw and shows Show new data instead. After a CloudZH update the page reloads itself and stays where you were.
Consoles
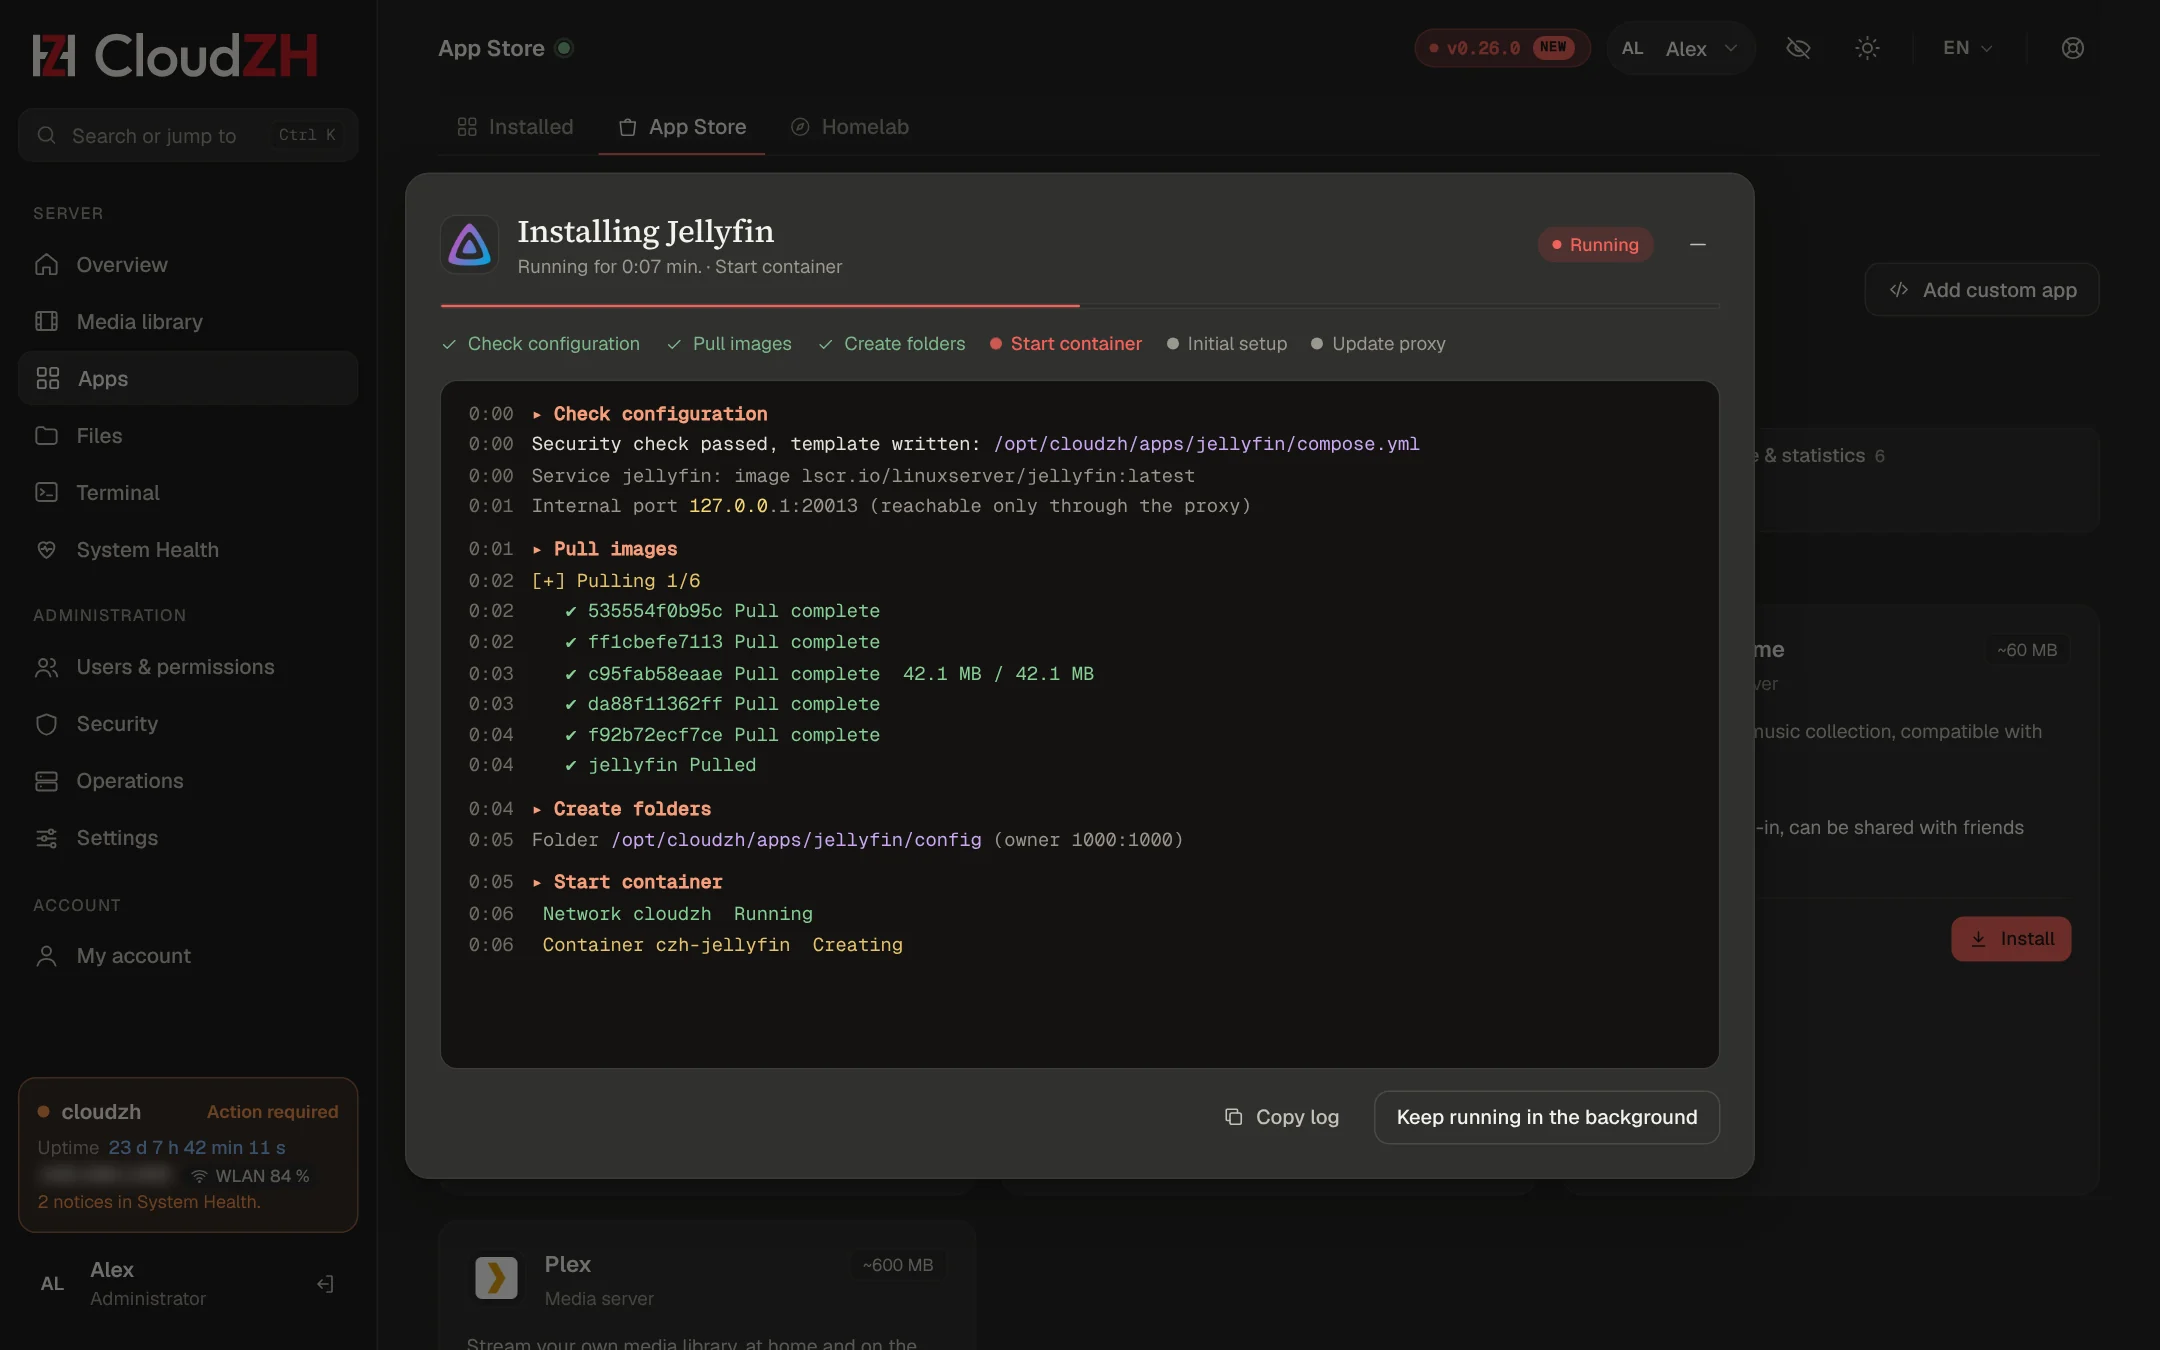
Installations, updates and repairs open a console. Successful jobs close after 60 seconds, failed ones stay open. Minimize them to the bar bottom right; several can run at the same time.
Search
Press Ctrl K to jump to any page, app or setting.
Look and language
Settings → Appearance: colours, theme, logo, labels and formats, see Customizing. The language is chosen per user: English, Deutsch, Español, Français, Português or Türkçe.
Customizing
Colours, layout, names and pictures: almost everything you see can be changed, and every change shows at once.
Overview widgets
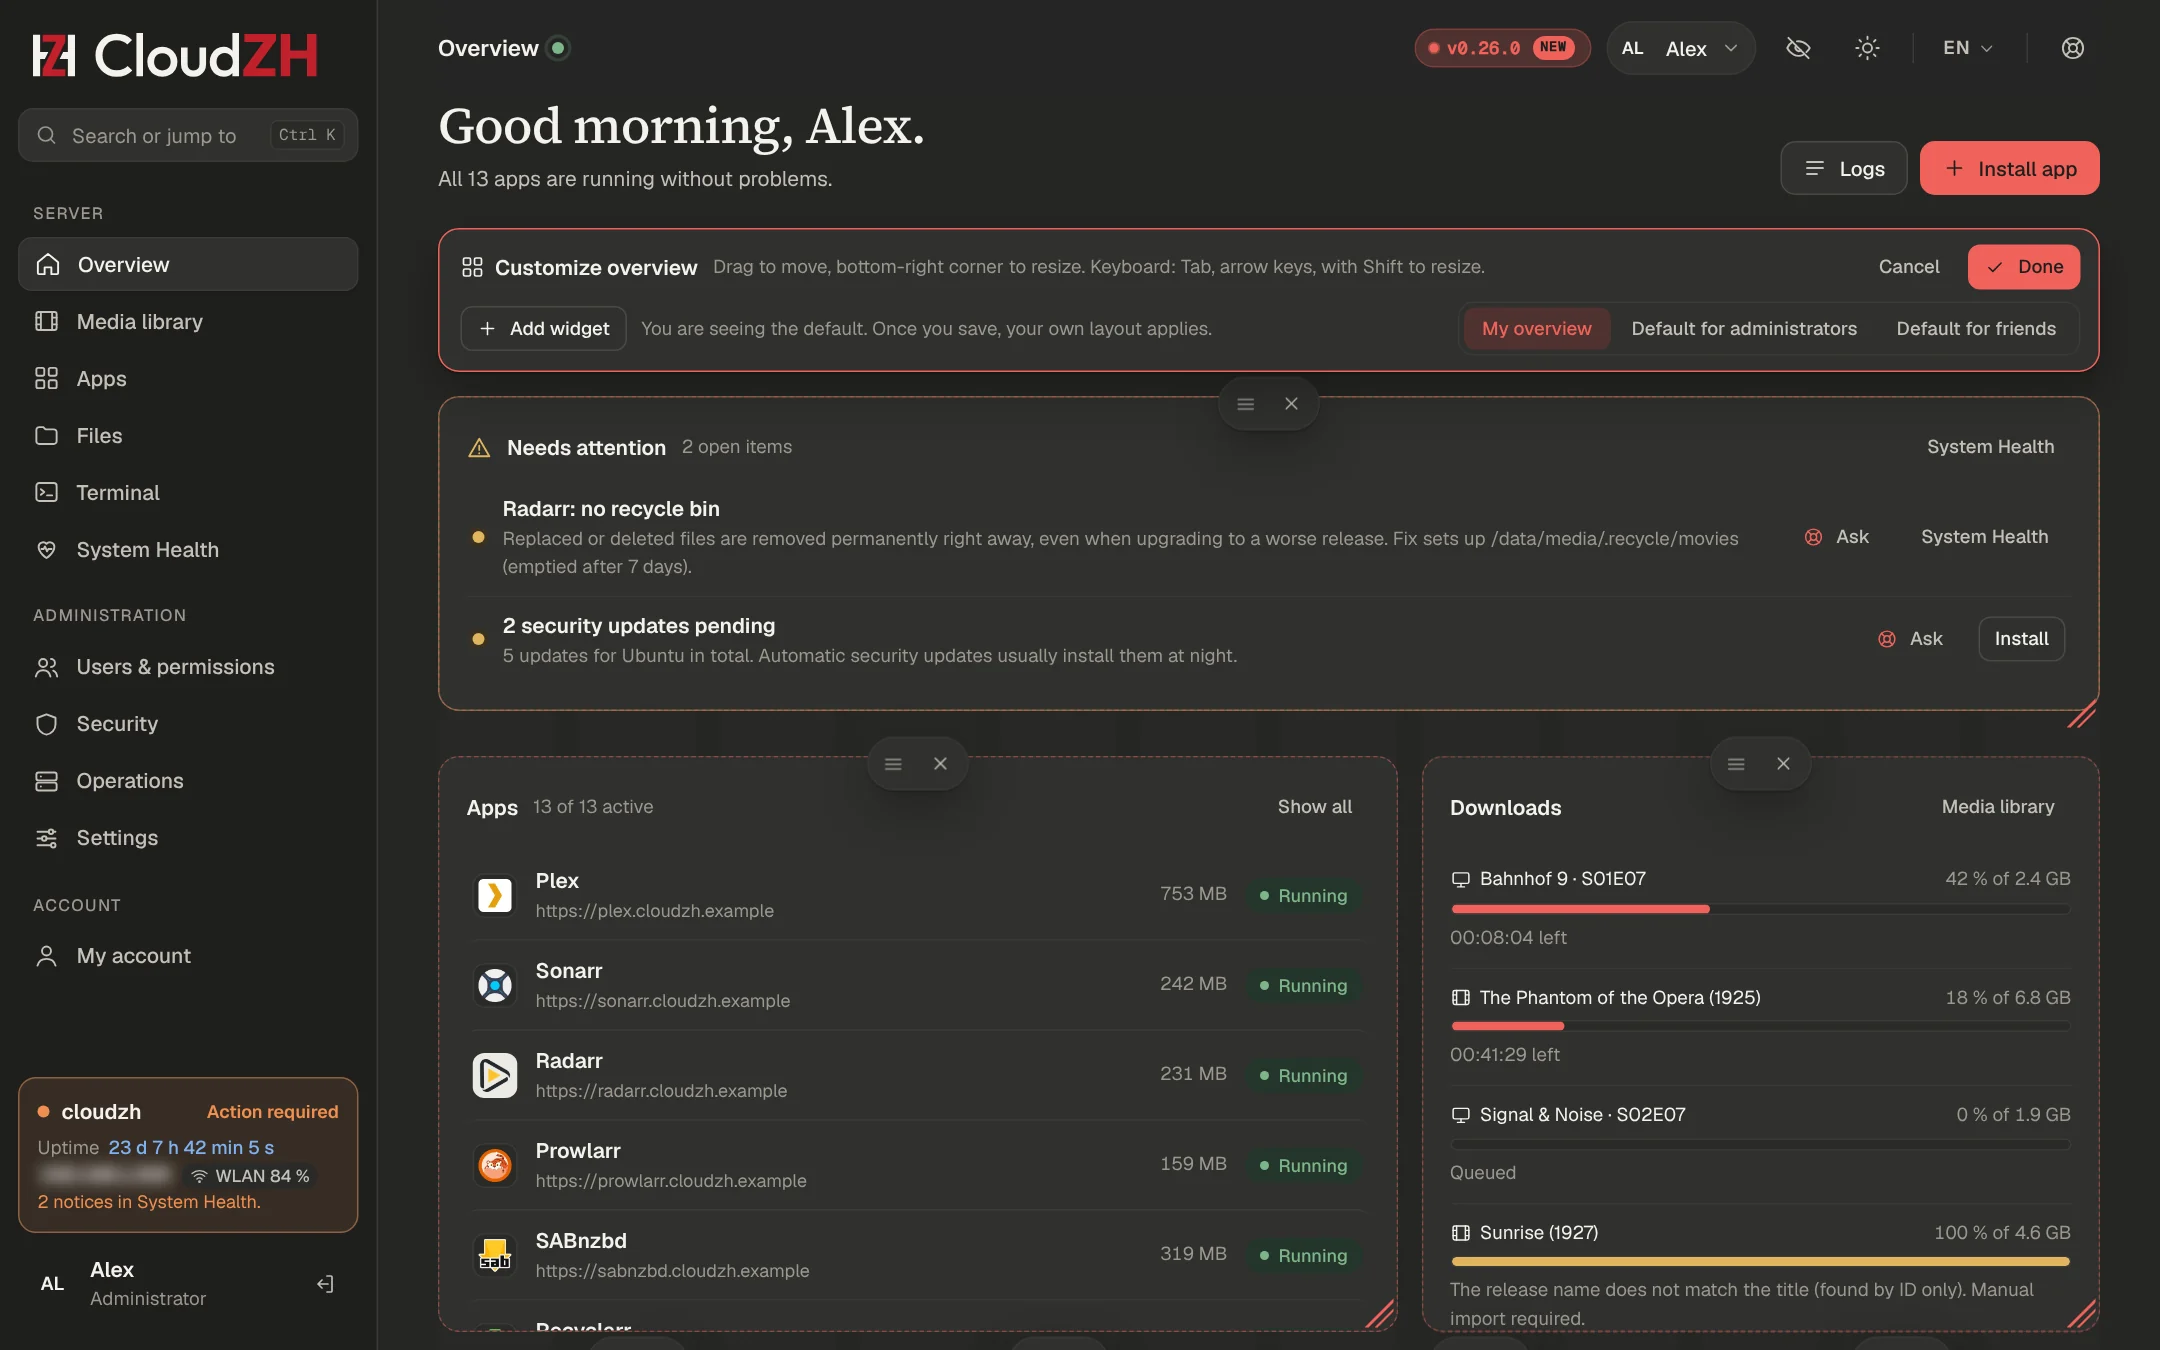
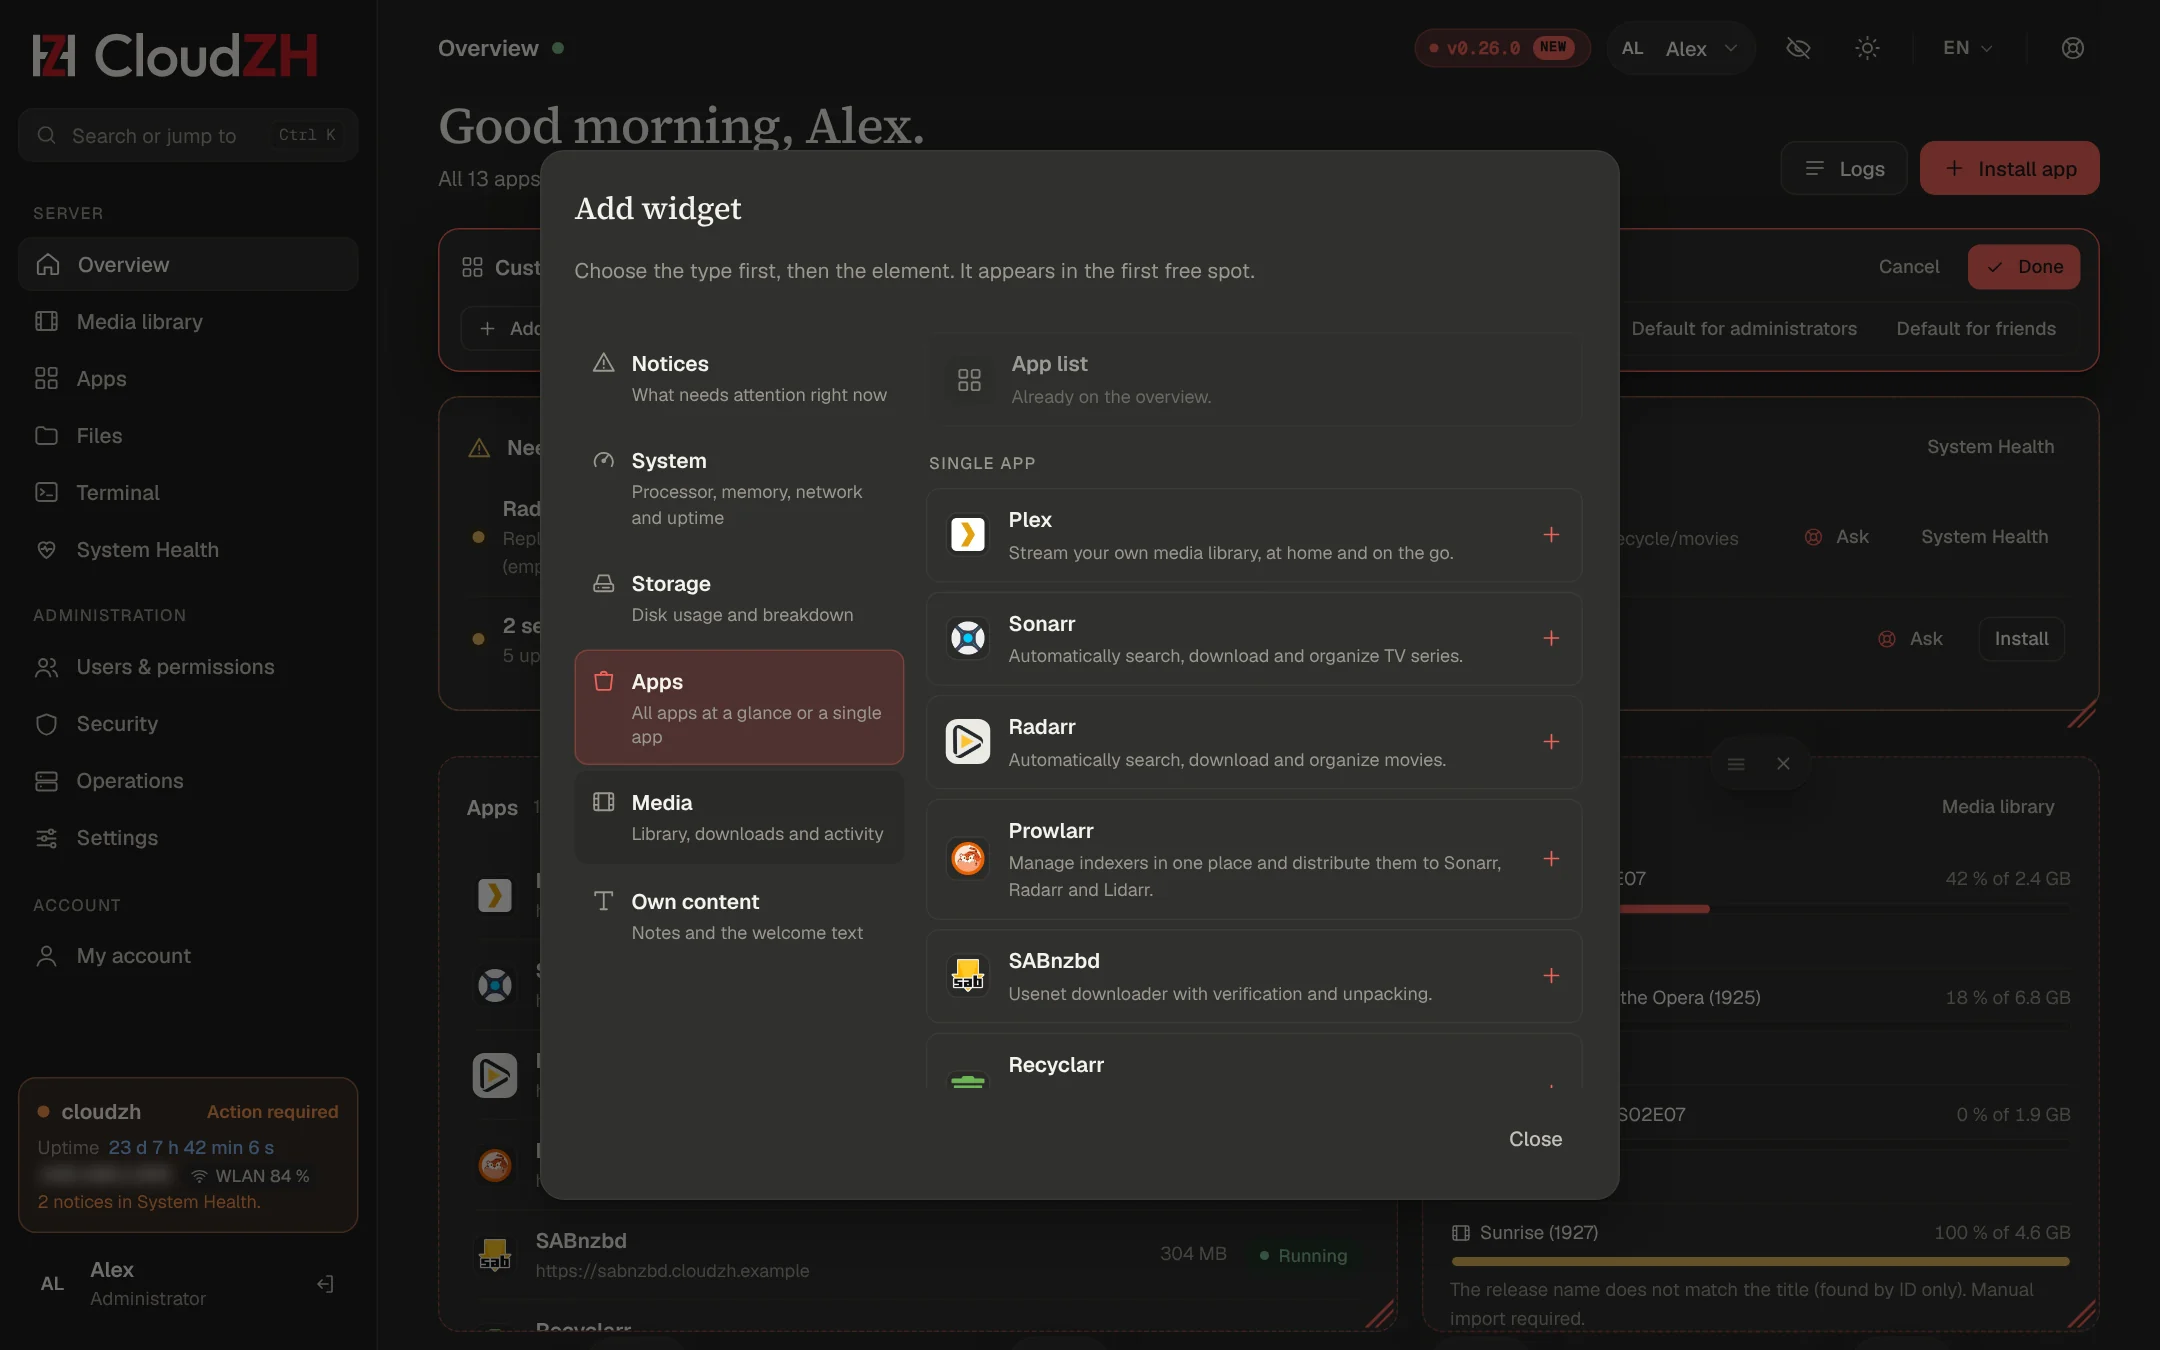
Open the overview and click Customize at the top right.
Drag a widget by its handle, resize it at the bottom right corner, remove it with ×. Widgets snap into a 12-column grid and gaps close by themselves.
Add widget asks for the type first (notices, system, storage, apps, media, own content), then the element: a single app as a tile, processor, memory, network, uptime, free space, the media library, a note or a welcome text.
Click Done to save, Cancel to discard.
Every user has their own layout, friends included; they only get widgets they have rights for. Administrators also set the default for administrators and the default for friends in customize mode. Reset to default removes your own layout. The keyboard works too: Tab to a widget, arrow keys to move, with Shift to resize.
Appearance
| Tab | What you can change |
|---|
| Colors | Nine presets or any colour of your own (lightened automatically for the dark theme), light, dark or like the device, sidebar like the page, dark or in the accent colour |
| Structure | Corners round, medium or square; density compact, normal or airy; headings with or without serifs; rename or hide menu entries |
| Logo & images | Your name and logo instead of CloudZH, a picture and texts for the sign-in page, the welcome text for friends |
| Language & formats | Default language, date and number formats |
Logo, favicon, buttons and charts take the accent colour. Overview, Security, Appearance and Settings always stay in the menu; hidden pages are still reachable with Ctrl K.
Profile pictures
My account → Profile: click the picture or Upload, move and zoom the crop, save. CloudZH stores a 256 × 256 image and drops location data from the photo. Administrators can change or remove the pictures of other users in the user window.
Hiding addresses
IP and MAC addresses appear blurred until you click them, handy for screenshots. The eye button at the top reveals all of them for the tab. Choose what to blur under My account → Appearance.
Apps & App Store
Install, update and remove apps with a live console. Each app gets its own address and its data under one tree.
Installing
Choose an app in the App Store and click Install. Some apps show a short form first, for example SABnzbd (Usenet server) and Plex (sign-in and libraries). Apps that create their own passwords, such as Paperless-ngx, Vaultwarden and Sonobarr, show the start password on the app page.
App page
Start, stop, restart, update the image, read logs, see CPU and memory, open the app. Admin apps open at <app>.example.com behind your dashboard login (example.com stands for your domain). In LAN mode an app opens at the server address and its usual port.
Homelab tab
39 further projects we looked at, with load (light, medium, heavy), requirements and notes: Home Assistant, Frigate, TP-Link Omada, Scrutiny, Apache Guacamole and others. They are not installable from the tab. Use Add your own app if you need one now.
Your own apps
Add a compose app of your own under Apps. It gets a card, a subdomain behind the login, logs and backups. Own apps keep a two-letter icon and never get a setup form.
Native apps
WireGuard and UniFi OS Server do not run in Docker. Install them on the server:
zh vpn install
zh unifi install
Left out on purpose
Torrent clients and tools around them, Readarr (discontinued), Overseerr, Jellyseerr and Ombi (replaced by Seerr), Unpackerr (SABnzbd unpacks itself), other dashboards and Docker managers.
Setup wizards & auto-wiring
Fill in the details once while installing. CloudZH connects the rest.
Plex wizard
- Click Connect with Plex. A Plex sign-in window opens (official PIN sign-in).
- Choose the server name, libraries (Movies, TV, optional Music), folders and metadata language.
- CloudZH claims the server, creates the libraries, enters your home network and the address
https://plex.example.com:443 (with your domain).
Your Plex tokenThe Plex account token stays in the dashboard's memory only, for at most 30 minutes, and is never written to disk, logs or the browser.
Connect apps
After every installation, in any order, CloudZH adds missing connections. Run it again with Apps → Connect apps or:
| App | CloudZH fills in | Still yours to do |
|---|
| Sonarr, Radarr, Lidarr | Root folders, SABnzbd as download client, recycle bin (7 days) | Nothing |
| Prowlarr | Sonarr, Radarr, Lidarr; SABnzbd with category prowlarr | Indexers |
| Tautulli | Plex address, server ID, own token | Nothing |
| Seerr | Plex and all libraries, Sonarr and Radarr with the CloudZH profile, Tautulli | Nothing |
| Maintainerr | Plex, Sonarr, Radarr, Tautulli, Seerr | Your rules |
| Bazarr | Sonarr, Radarr, German + English, free subtitle sources | Optional OpenSubtitles account |
| Lingarr | Radarr, Sonarr, English → German | Translation service key |
| UmlautAdaptarr | Sonarr, Lidarr, proxy in Prowlarr | Tag on the indexers |
| LazyLibrarian | SABnzbd categories, folders, Prowlarr | Nothing |
| Kometa, SuggestArr | Plex (SuggestArr also Seerr) | TMDb key |
| Sonobarr | Lidarr | Last.fm key |
| Requestrr | Sonarr, Radarr | Discord bot token |
Apps with their own admin account (Jellyfin, Immich, Kavita, Audiobookshelf, Navidrome, Wizarr) ask you to create it on first open.
One Plex device per appEvery app that talks to Plex gets its own token. In Plex they appear under Authorized devices as "CloudZH Tautulli", "CloudZH Seerr" and so on, so you can revoke one without touching the others.
TRaSH recommendations
Apps → TRaSH recommendations (or zh apps tune) sets naming, media management and download handling in Radarr and Sonarr, and the recommended SABnzbd switches, using the values from the TRaSH Guides. It runs once automatically after installing those apps. Existing files keep their names.
Media library
One place for you and your friends to see what is there, what is missing and what is downloading.
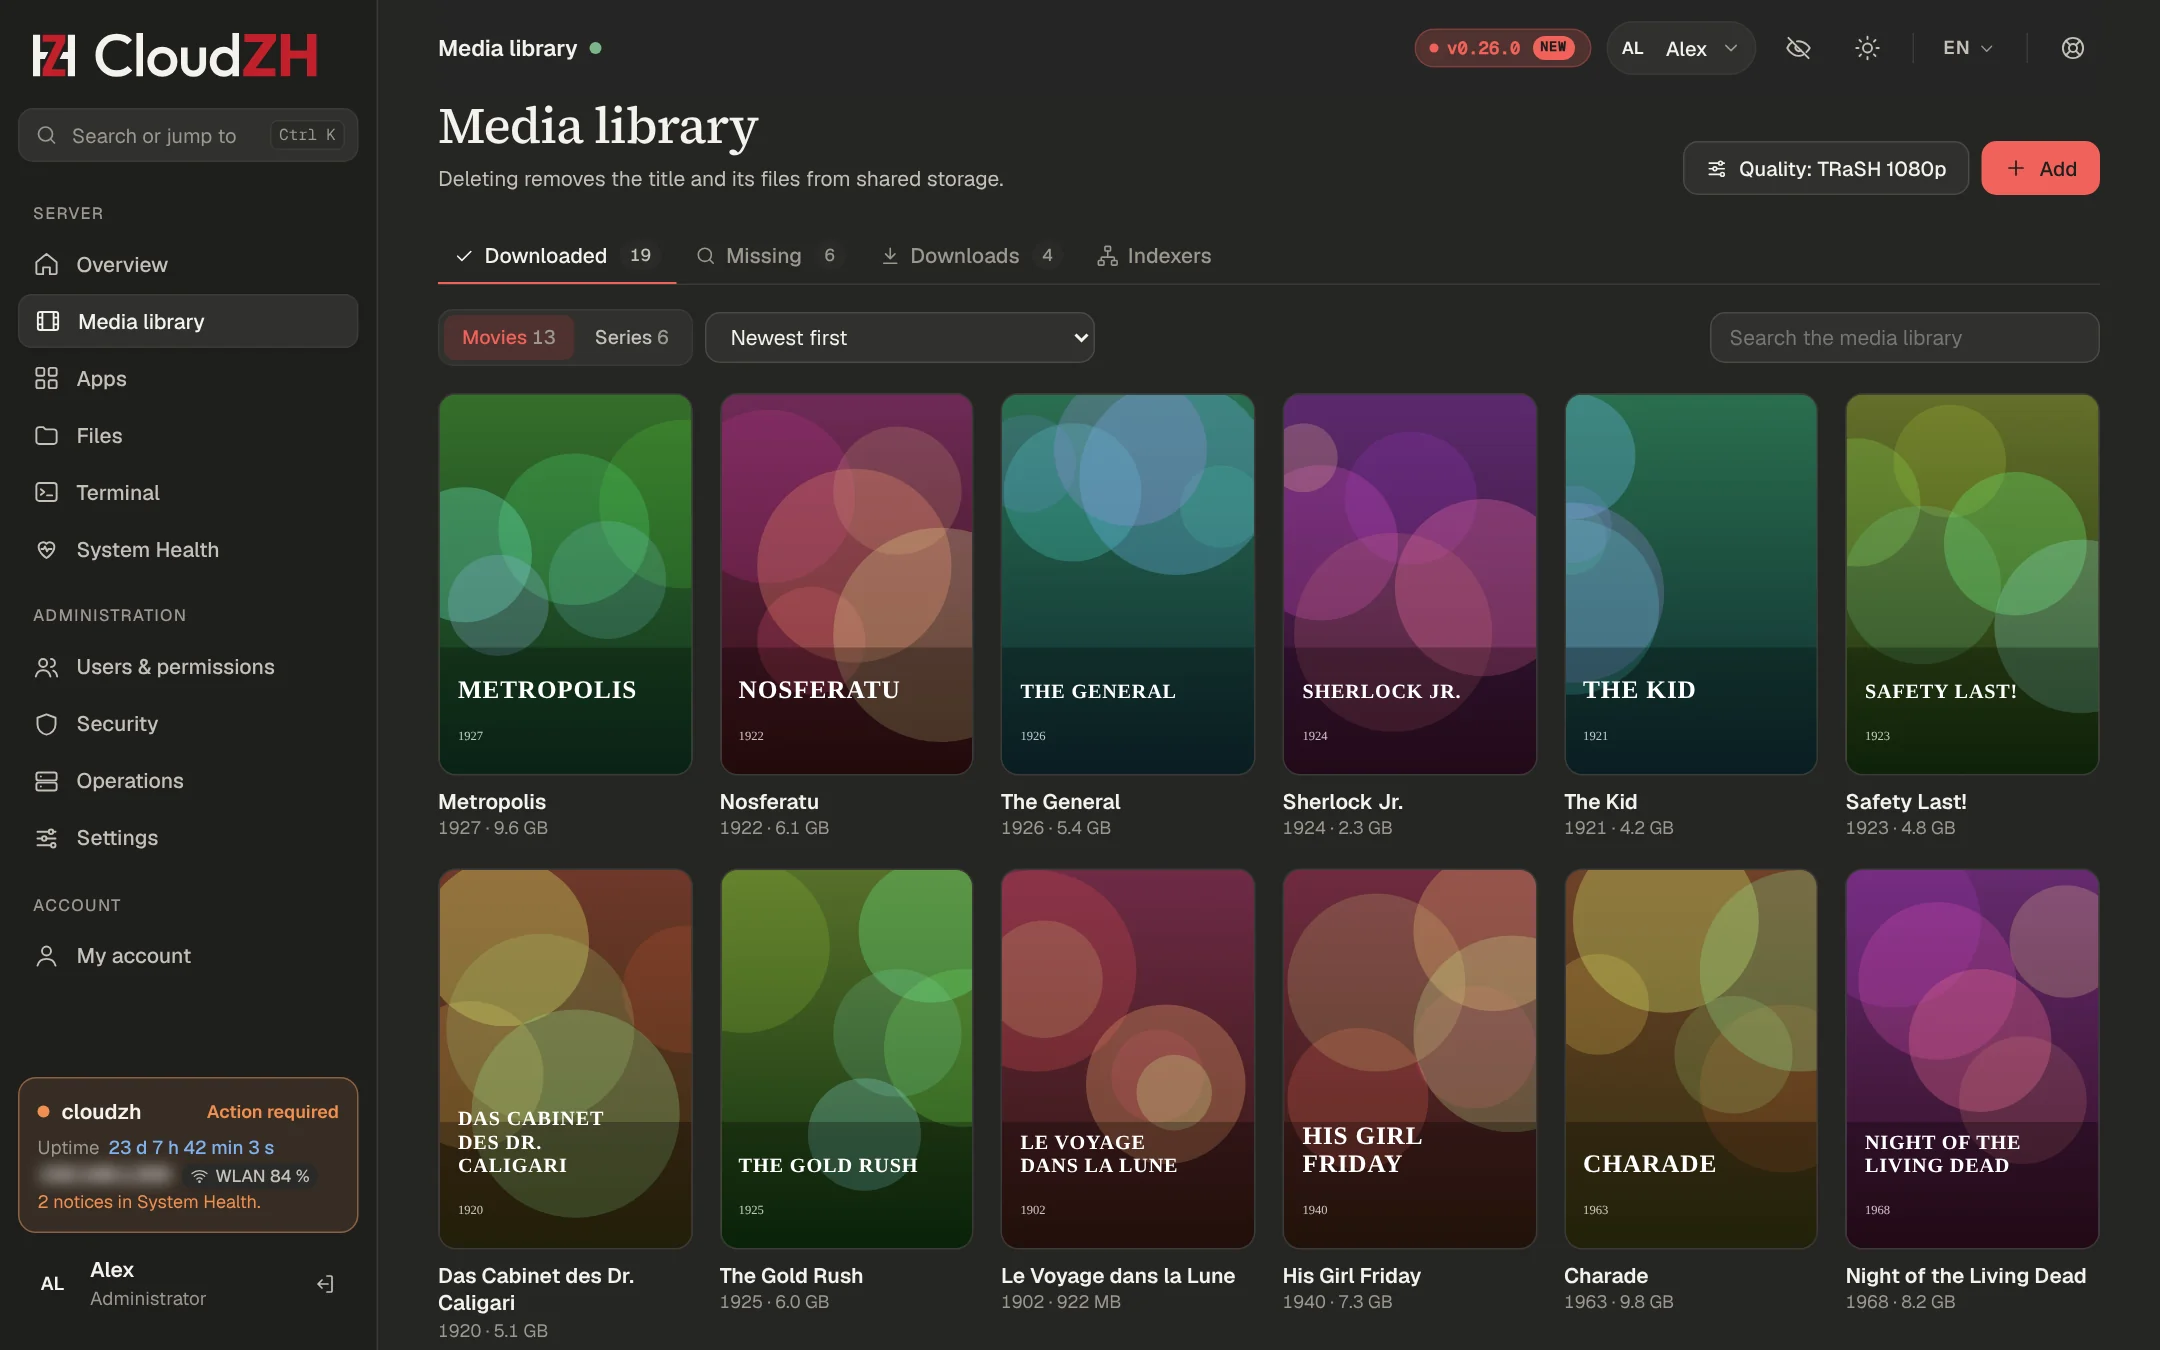
Tabs
| Tab | Shows |
|---|
| Downloaded | Films and series with files |
| Missing | Films without a file and episodes missing per season, with hints such as "not released yet" or "downloading 64 %" |
| Downloads | Queue with quality, indexer and plain-language messages |
| Indexers | Admins only, needs Prowlarr: status, queries, grabs, response time, test all, search |
Missing titles
- Search asks Radarr or Sonarr to look again and reports whether a download started.
- Availability lists what the indexers have and why releases were rejected.
- Other quality: when only the quality does not match, releases are grouped by resolution. Load in 720p downloads the best one once. Your profile stays the same and Radarr upgrades later.
Quality
Media library → Quality offers three modes:
- CloudZH preset: 720p, 1080p (default), 4K, 720p to 1080p, 1080p to 4K or any. Language for films. Upgrades on or off. Camera recordings, screeners, disc images and remuxes are always excluded.
- TRaSH Guides: 1080p, 4K, Remux 1080p or Remux 4K with language Original, German preferred, else English or German only. Needs Recyclarr from the App Store; CloudZH writes its own config file and syncs daily.
- Own profile: CloudZH leaves Radarr and Sonarr alone.
Manual import
Some German releases stop at 100 % with "Manual import required", because Radarr matched them by ID and the title does not fit. Admins see an Import button with a preview of the file before anything moves.
Indexers
Keep indexers in Prowlarr only. Prowlarr syncs them to every app. After the switch, delete the old entries you created by hand in Radarr and Sonarr, otherwise every search runs twice and uses up your daily limits.
Friends & permissions
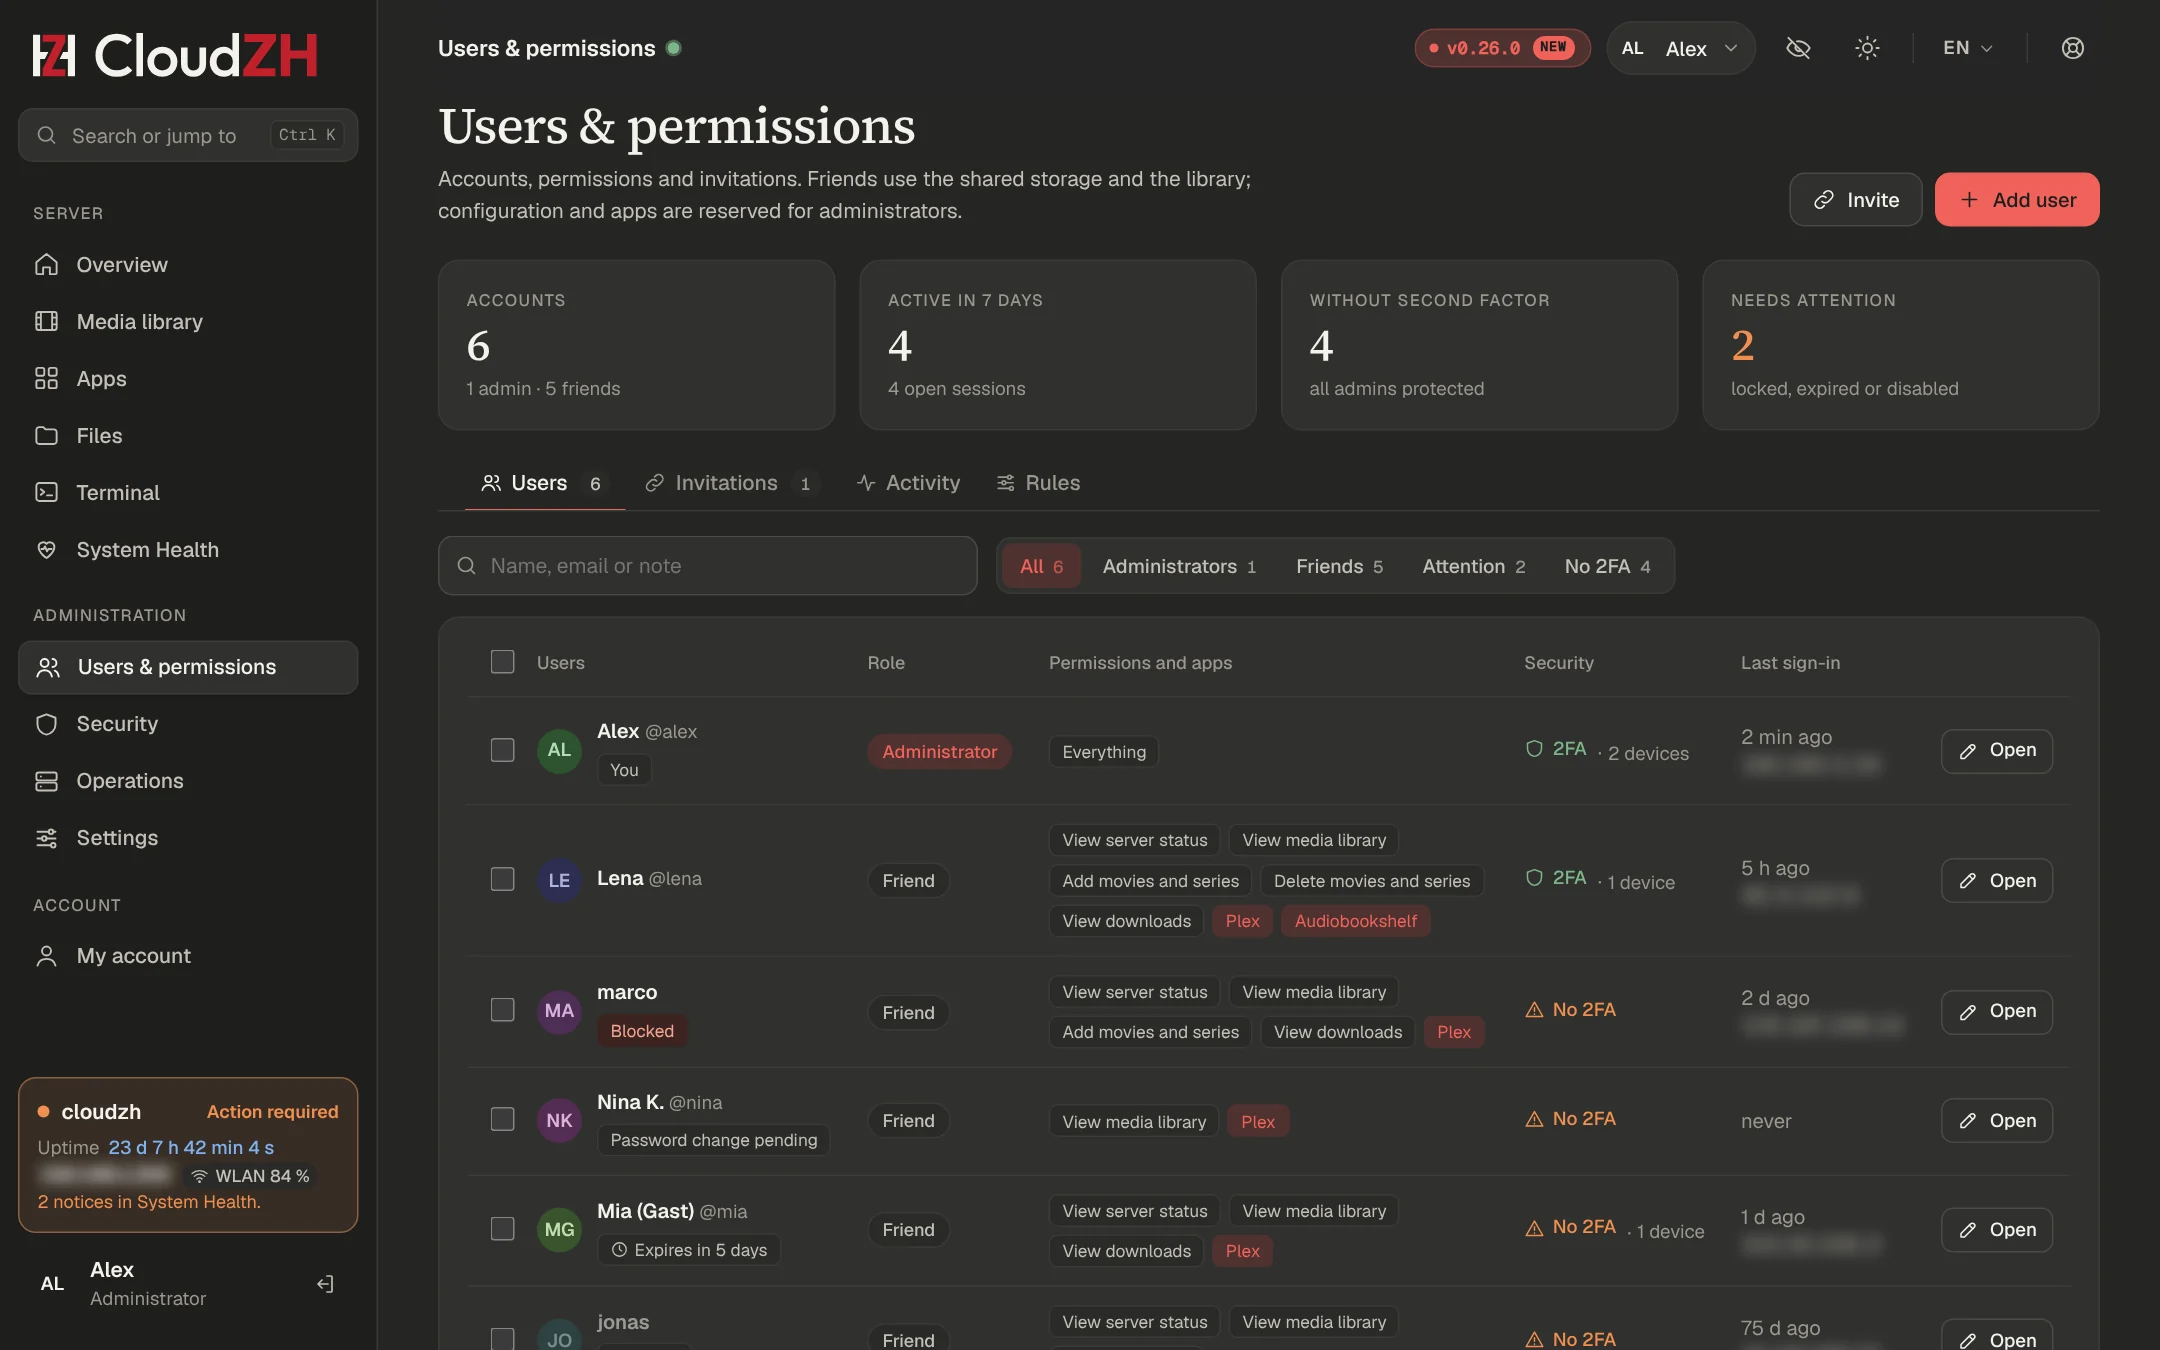
Friends get accounts with rights per person and work only in the media library.
Roles and rights
Administrators manage the server. Friends get any of these rights: see status, view the library, add titles, delete titles, see downloads. Templates: View only, View and request, Everything for friends.
Invite links
Users & permissions → Invitations → Invite. Per link: rights, apps, valid 1 to 30 days, 1 to 20 accounts, optional end date for the accounts. The link is shown once; only a hash is stored. The friend picks a name and password and is signed in directly.
Managing users
- Search, filter (admins, friends, attention, without 2FA) and bulk actions: sign out, require new password, deactivate, delete.
- Rename a user without losing sessions, passkeys or rights. The old name stays blocked for 30 days.
- Friends can rename themselves if the rule allows it (default: every 7 days).
- Activity per user and an audit trail of all changes.
On the server
zh users
zh rename-user anna anna.m
zh enable-user anna
zh reset-password anna
zh reset-2fa anna
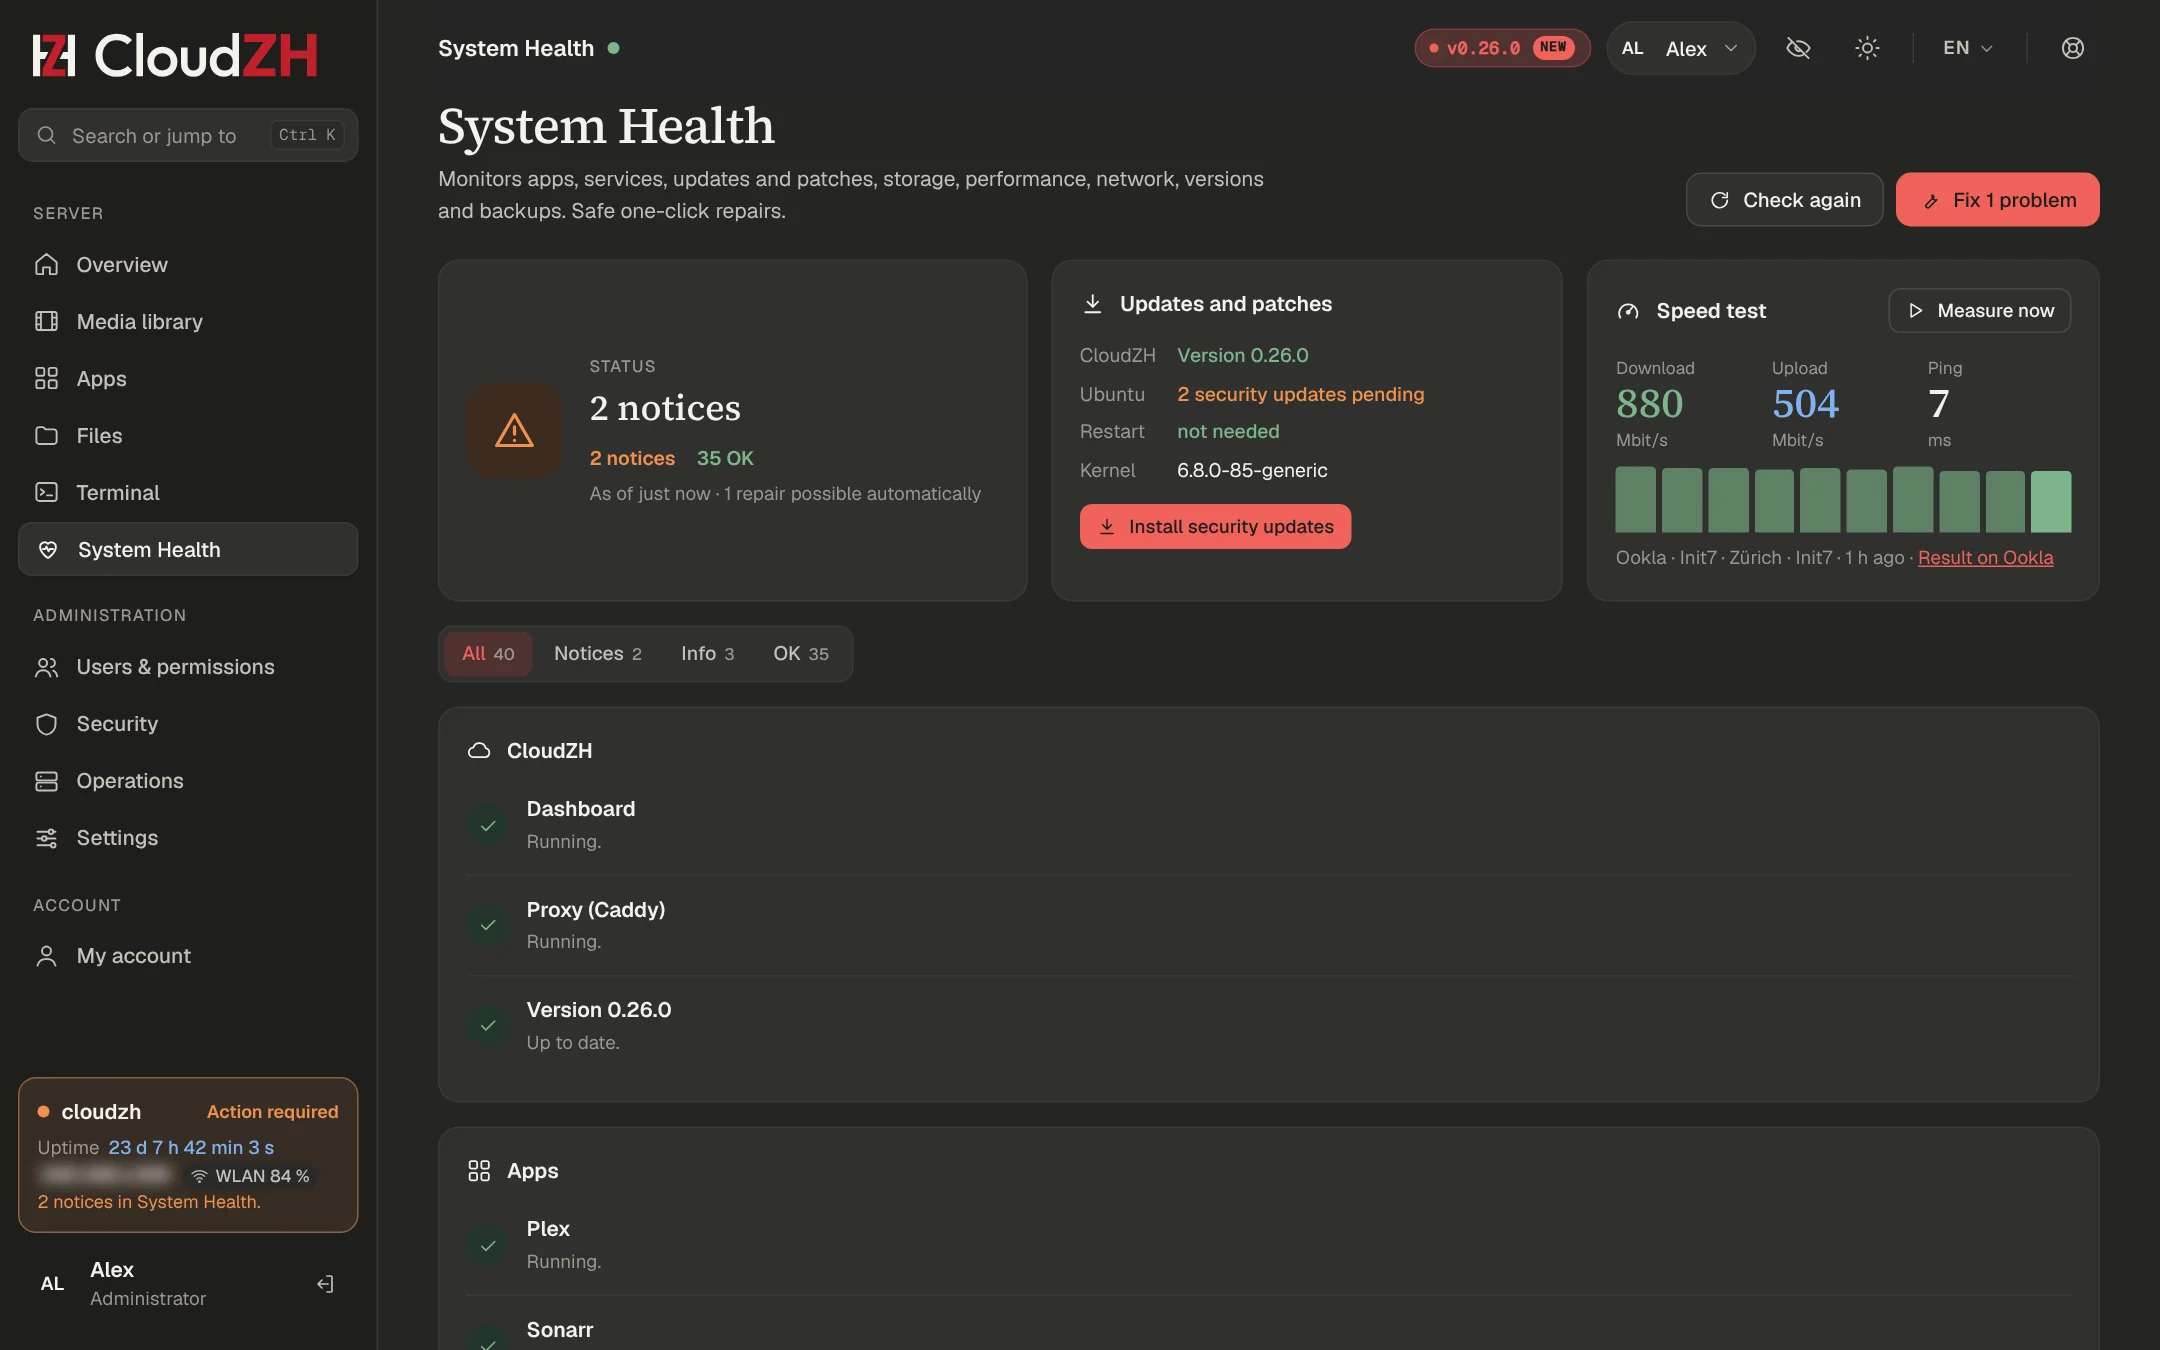
System Health
One check of the whole server, with repairs you can run by button.
What it checks
CloudZH itself, apps, services, updates and patches, storage, performance, network, versions, backups and the media library. Problems are red and turn the server card red. Notices are yellow.
Failed CloudZH, Docker, SSH, Fail2Ban, WireGuard and network services count as problems. Other Ubuntu services count as notices.
Hiding findings
Every problem, notice or info has a Hide button: until something changes (it returns when the finding gets worse or its title changes), or for 7 or 30 days. Hidden findings do not count for the server state, the sidebar, the assistant or Fix problems. The filter Hidden lists them with a button to show them again. zh doctor always shows everything.
Repairs
Repairs are fixed procedures in the agent, never free commands. Run them by button or on the server:
zh doctor           # check only
zh doctor --fix     # check and run safe repairs
zh doctor --fix --apt   # also repair Ubuntu packages
Self-healing
Every 2 minutes CloudZH repairs safe cases on its own: crashed apps, the dashboard and proxy, important services, time sync, a full disk (unused Docker images only), an expiring certificate and a missing recycle bin in Sonarr, Radarr and Lidarr. A finding has to show up twice in a row first, and nothing happens while an install or update runs. Apps you stopped by hand and hidden findings are left alone. If a repair doesn't help after 3 tries, you get a notification and the finding stays in the list with its button.
The section Self-healing in System Health shows the latest repairs and has the switch to turn it off. On the server:
zh doctor --auto        # status and latest repairs
zh doctor --auto off    # repairs by button only (on: back on)
Security updates
Install security updates runs Ubuntu's own unattended upgrade: security channel only, packages with configuration questions are skipped, nothing is removed and the server does not restart by itself. When a kernel update needs a restart, System Health shows Restart required.
Speed test
Run a speed test with history. CloudZH measures with Cloudflare's speed test by default. The Ookla CLI is optional (zh diagkit ookla on) and licensed for personal, non-commercial use only.
Performance & server commands
Find out why the dashboard feels slow while two films download, and restart the server cleanly.
Performance diagnosis
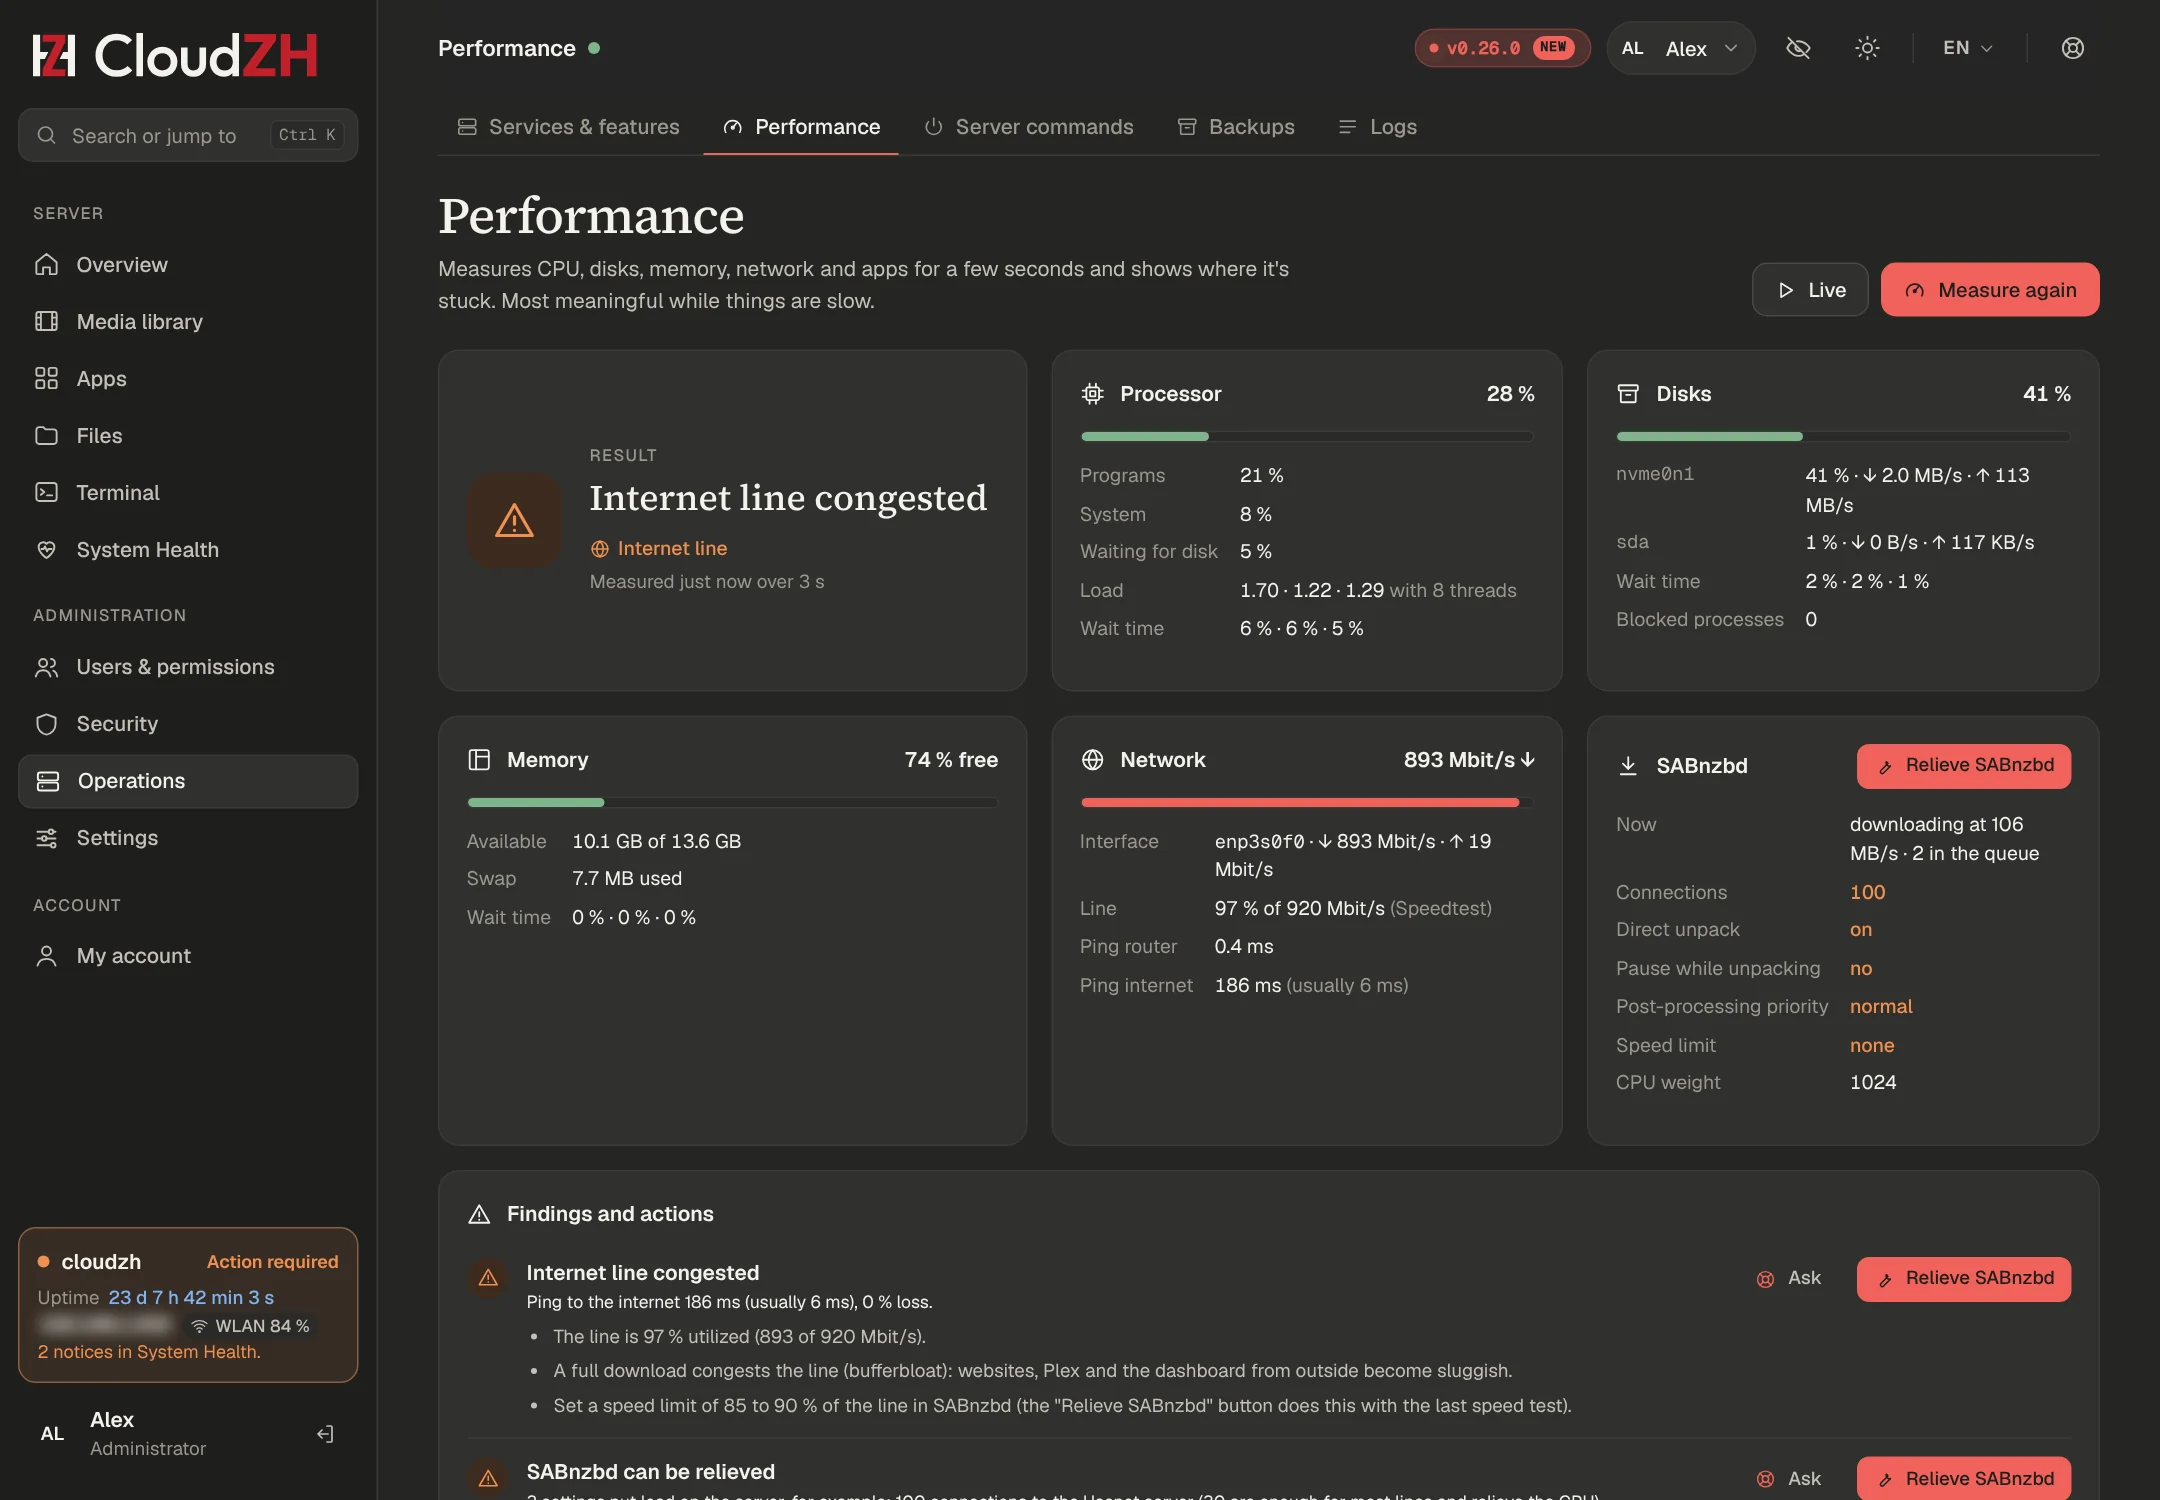
Operations → Performance measures for three seconds: CPU (programs, system, waiting for disk), pressure over 10 s, 1 min and 5 min, memory and swap, load per disk, network, ping to the router and to 1.1.1.1, CPU and disk per container, and the SABnzbd queue. The result names the bottleneck with tips.
zh perf          # one measurement
zh perf --live   # live view
zh perf --fix    # relieve SABnzbd
Measure under loadRun the diagnosis while downloads are running. Without load, CloudZH says so instead of guessing.
Relieve SABnzbd
Reduces the main server to 30 connections when it uses more than 50, turns off direct unpacking, pauses downloads during post-processing, lowers SABnzbd's CPU and disk priority and can set a speed limit at 90 % of your last speed test. SABnzbd restarts briefly.
Server commands
Operations → Server commands: restart or shut down now, in 5, 15, 30 or 60 minutes, or tonight at 04:00. CloudZH warns about running jobs. Shutting down asks you to type the server name.
zh reboot --in 30
zh reboot --status
zh reboot --cancel
zh poweroff --in 15
Maintenance by button: restart all running apps, restart dashboard and proxy, reset failed services, clean up Docker, shorten the journal, renew the certificate, sync the time.
Terminal & Files
A real shell and a full file manager in the browser, with stricter rules than the rest of the dashboard.
Terminal
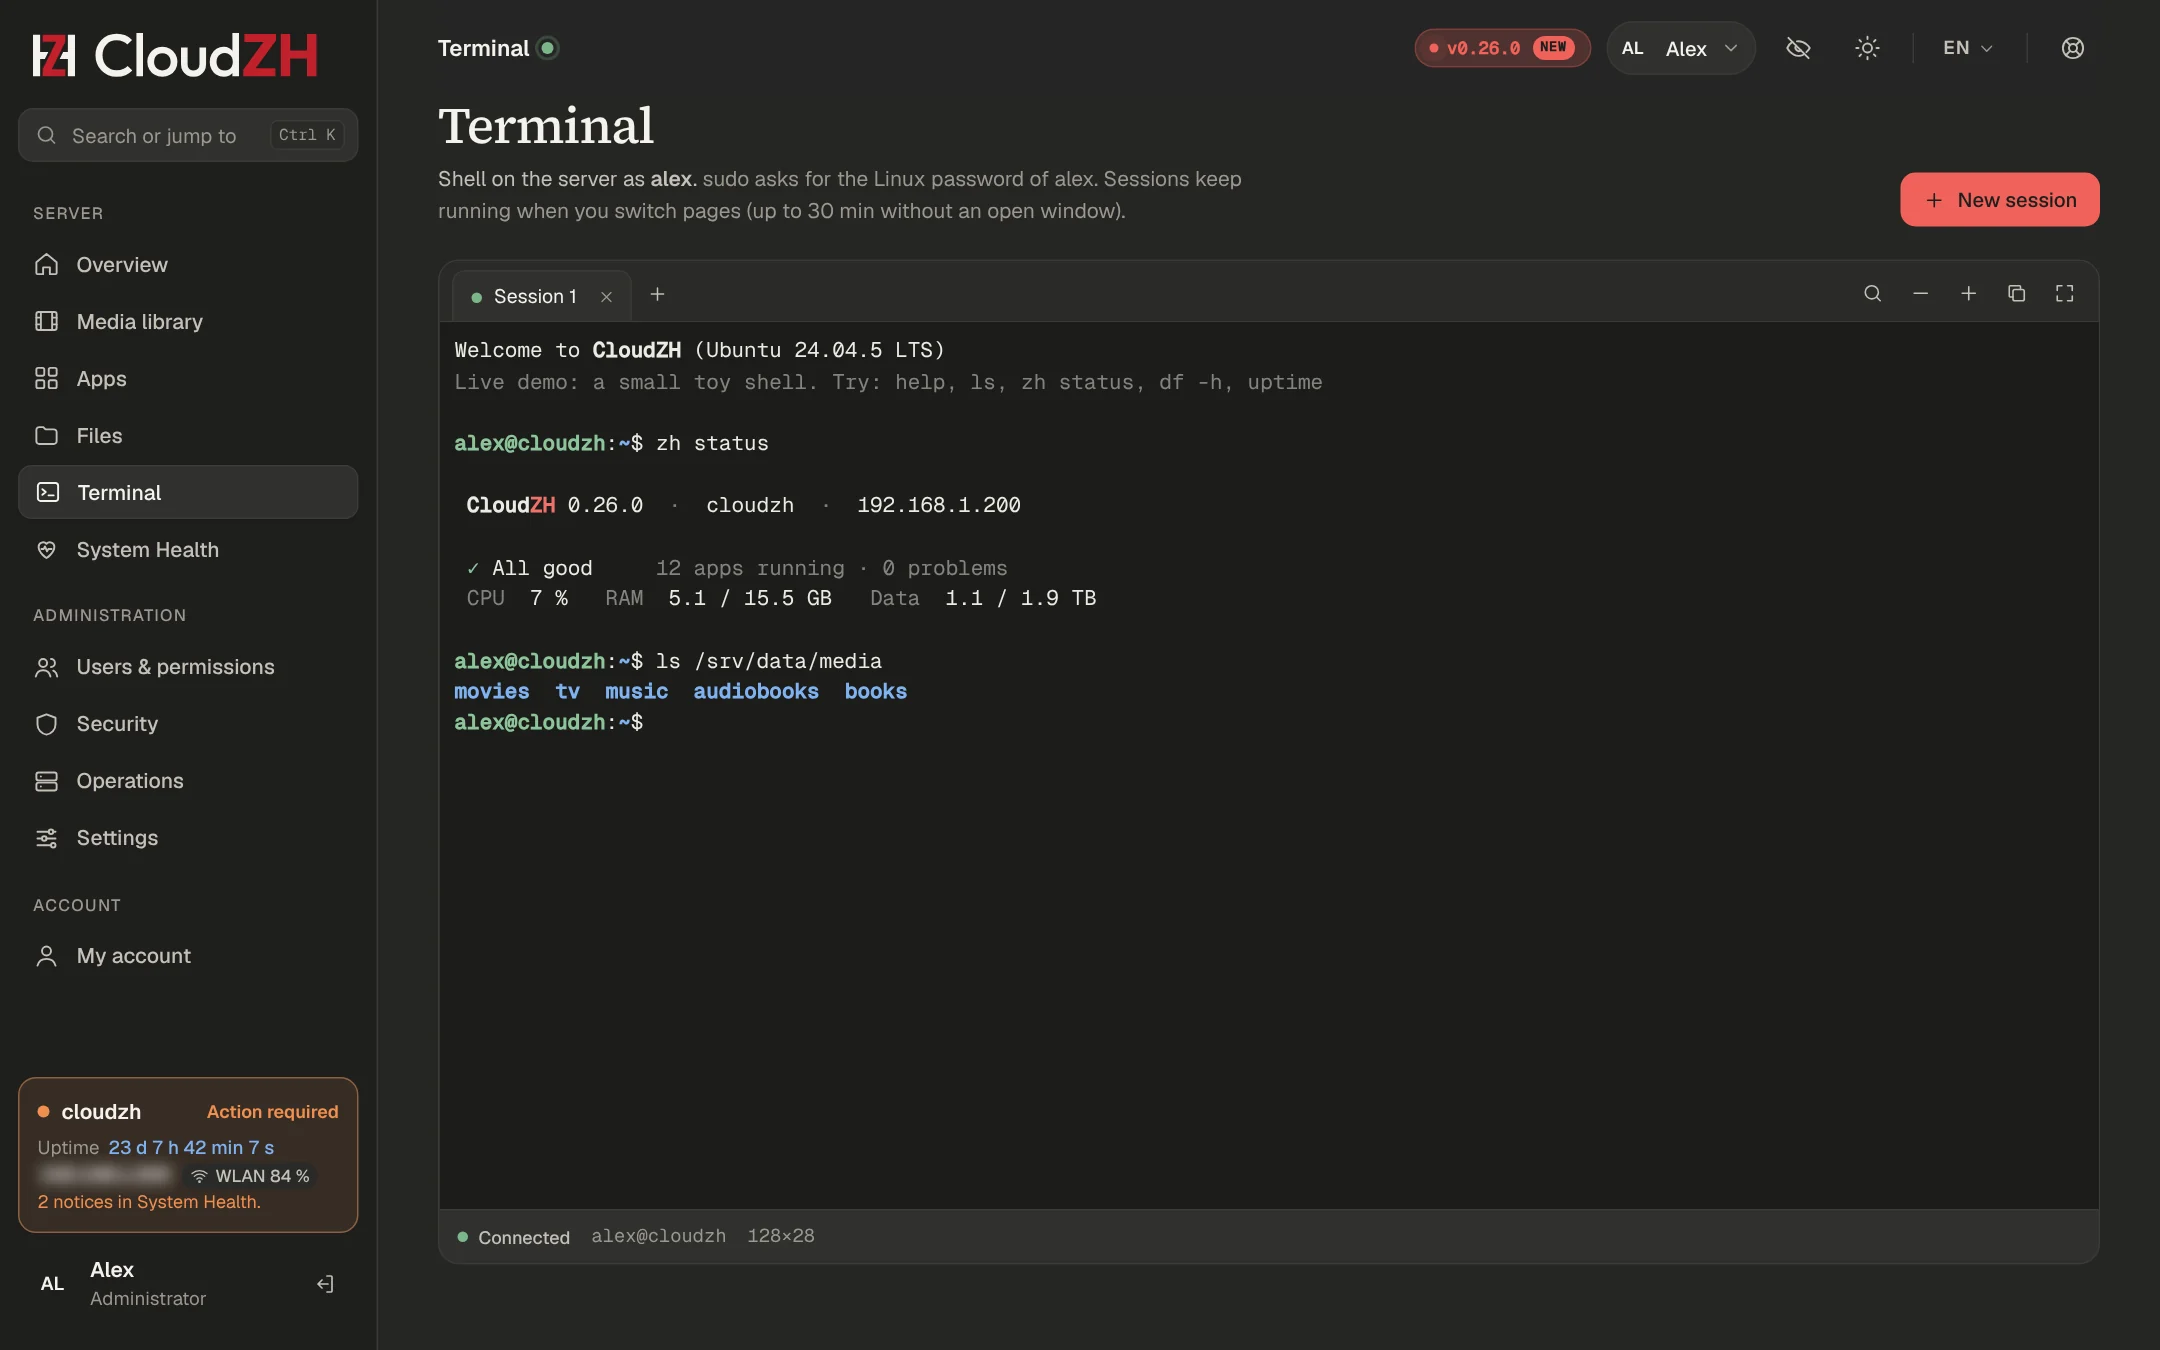
- A shell as the Linux user who installed CloudZH.
sudo asks for that user's Linux password.
- Only administrators with a passkey or 2FA. Every new session asks for your password.
- By default only from your home network or VPN.
- Several sessions as tabs. They keep running when you change page and close 30 minutes after the last window.
zh terminal status
zh terminal off
zh terminal remote on    # also allow outside home and VPN
zh terminal close-all
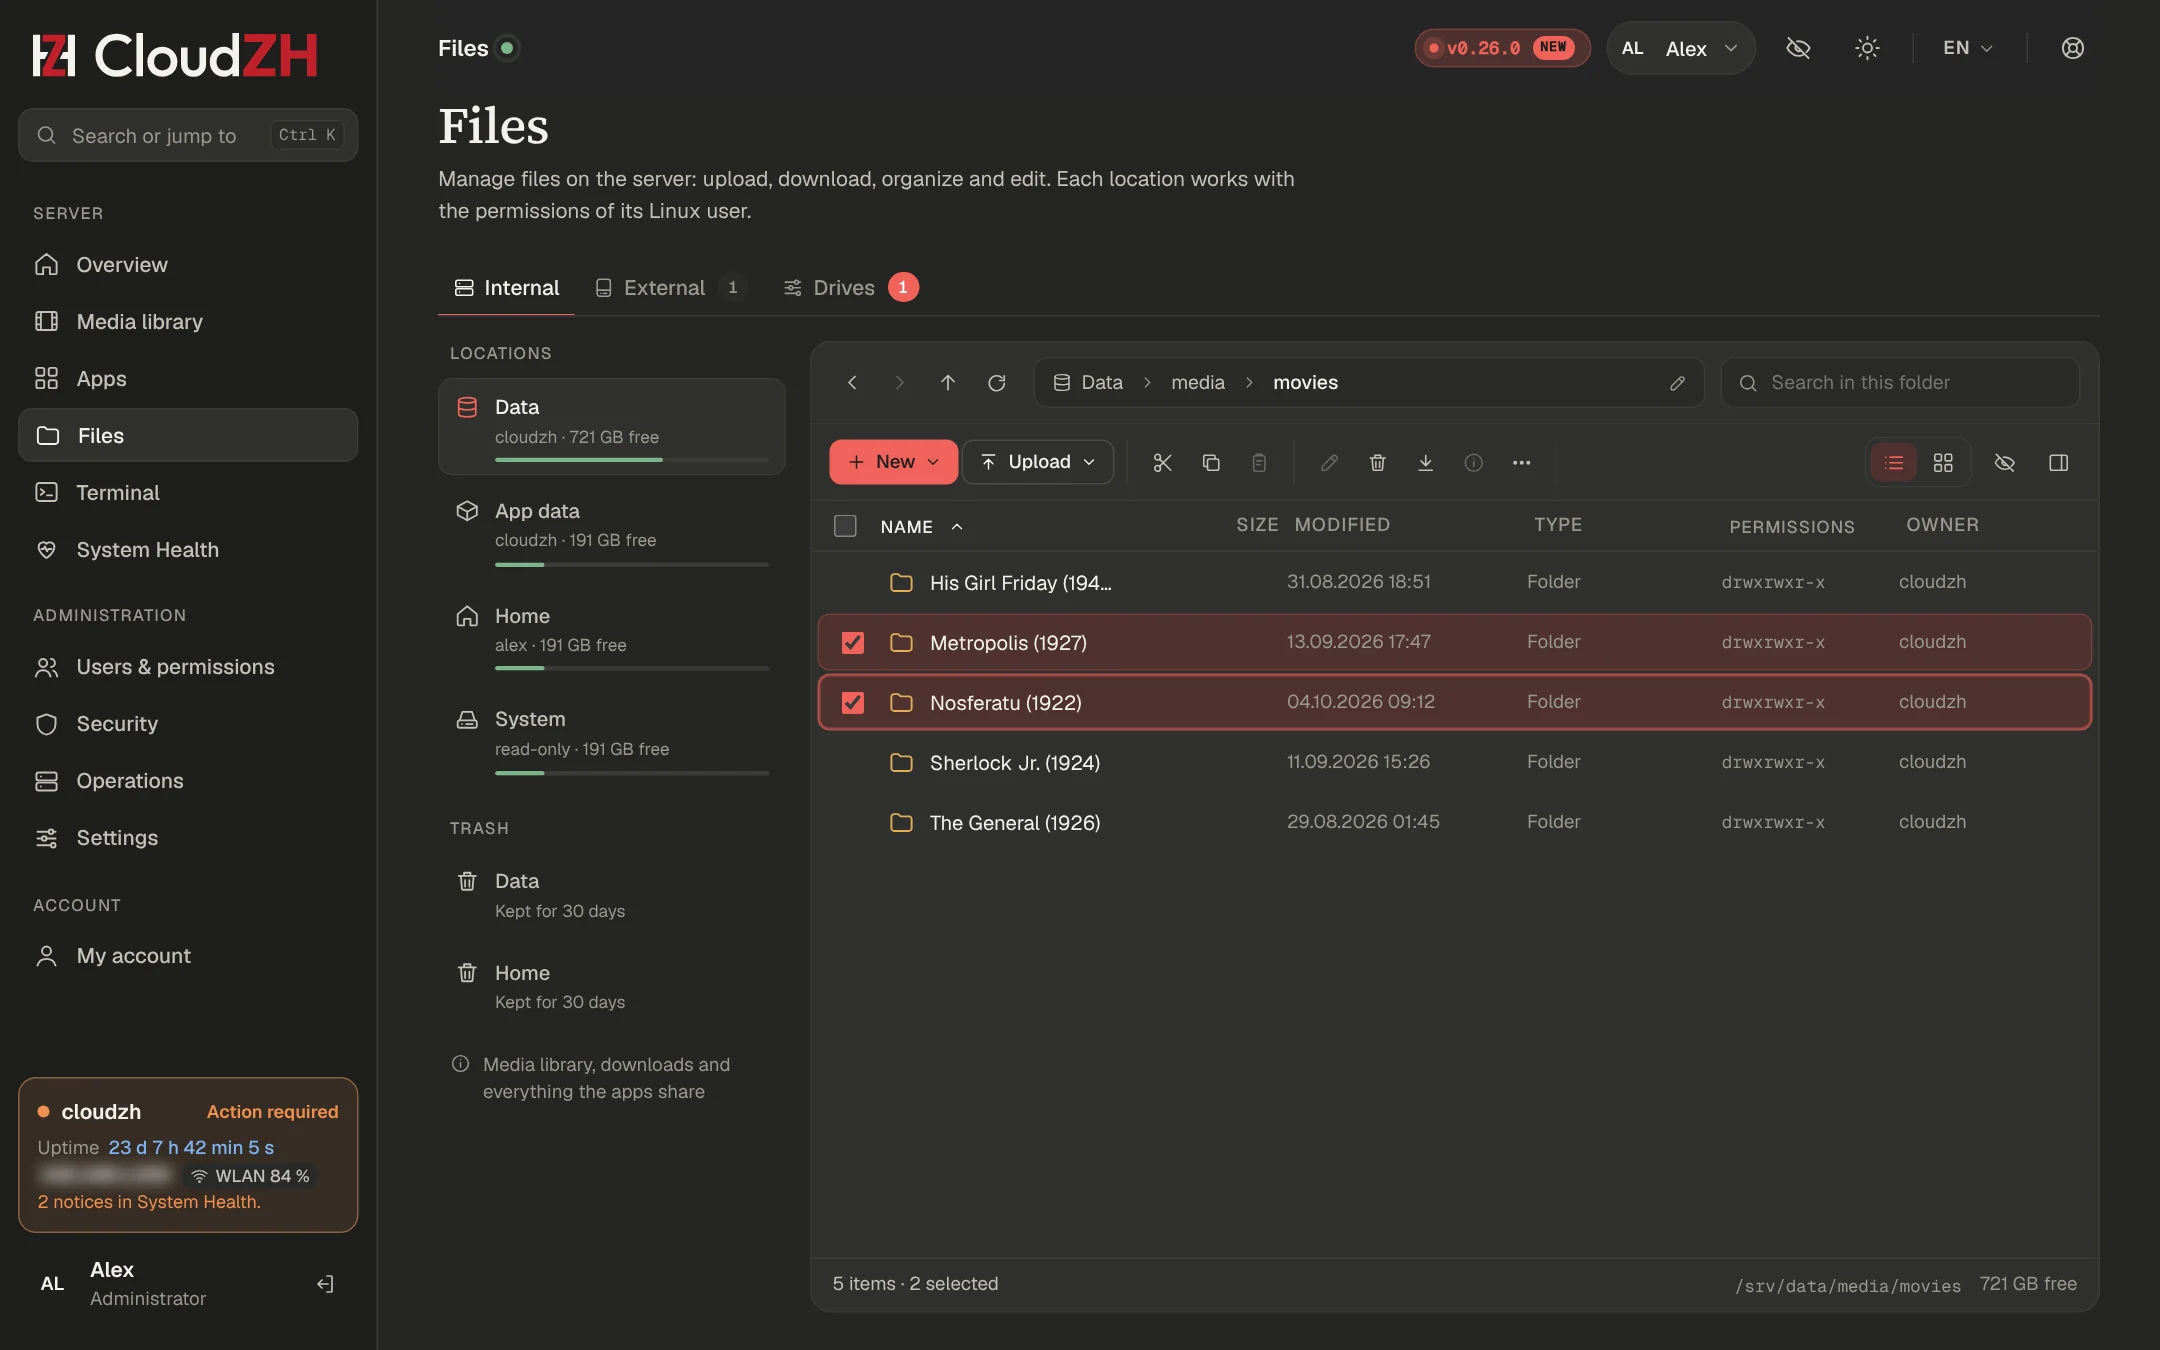
Files
| Place | Contains | Access |
|---|
| Data | /srv/data | Read and write |
| App data | Folders that belong to the app, never its compose file | Read and write |
| Home | Home of the Linux user | Same rules as the terminal |
| System | / | Read only |
Upload in pieces (also folders, drag and drop), download single files or as ZIP, copy, move, rename, pack and unpack, edit text, change permissions. Deleted files go to a 30-day recycle bin. Repair permissions helps when Sonarr or Radarr report "Permission denied". Turn the file manager off with zh files off.
External drives
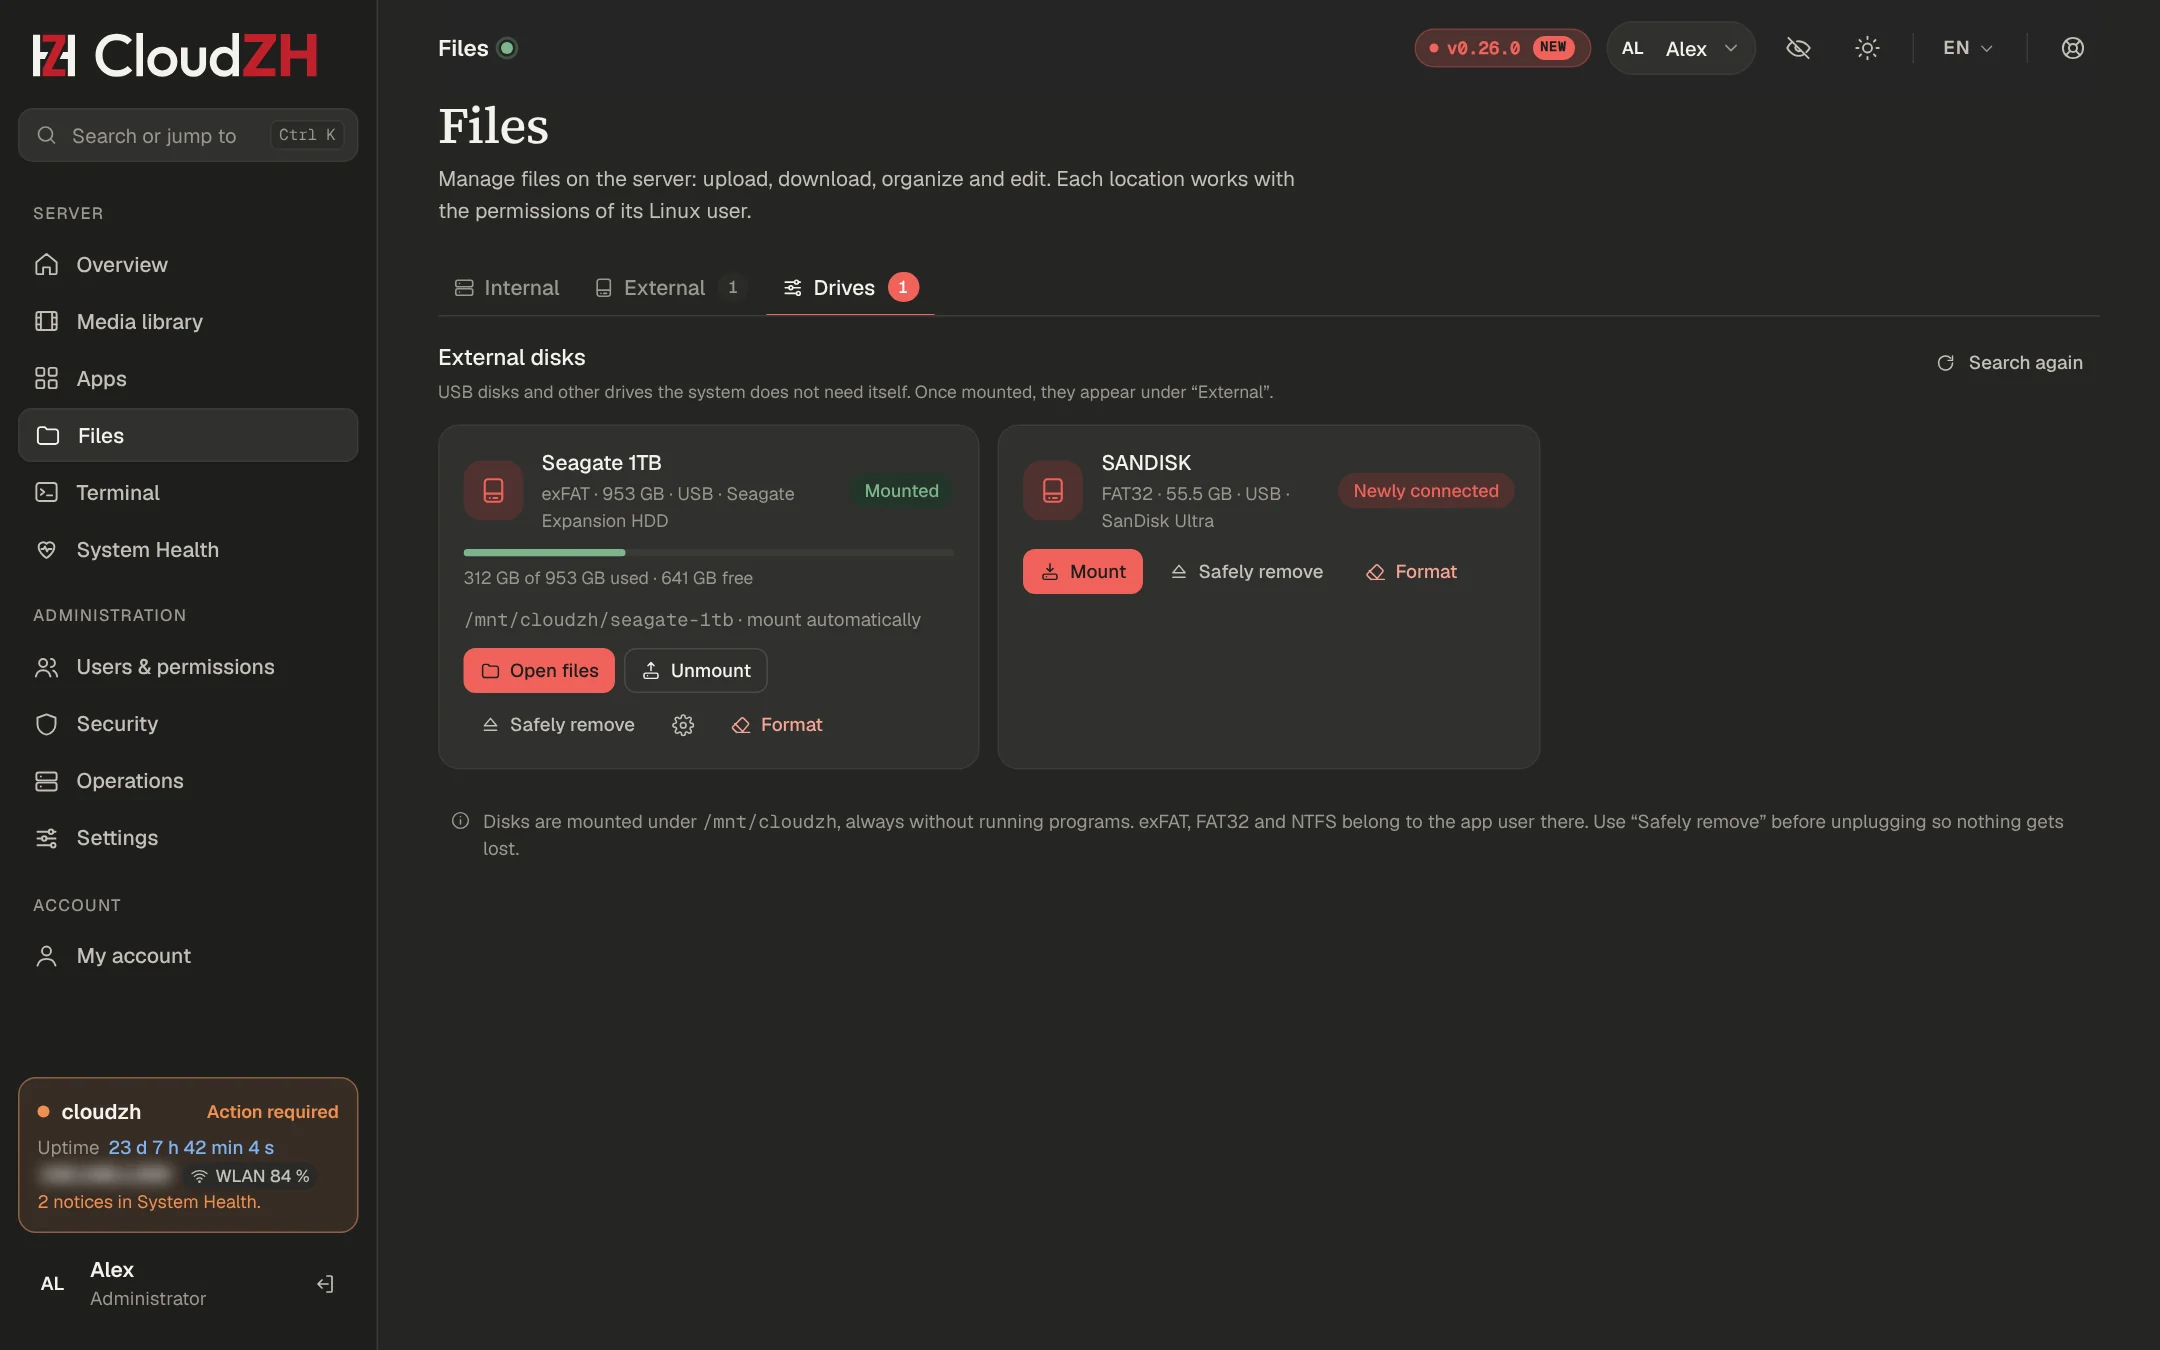
Files has three tabs: Internal, External (mounted USB disks) and Drives. A disk you plug in appears under Drives with its file system, size and model.
- Mount, Unmount and Safely remove (writes everything, unmounts and powers the disk down).
- Mount automatically when plugged in and after a restart (on by default), read only and a display name per disk.
- Format a new disk as ext4 (best for this server) or exFAT (also readable on Windows and Mac). Asks for your password and the disk name; disks with data, app data or the system are never offered.
- Copy or move between your data and an external disk with cut, copy and paste across tabs.
Supported: exFAT, FAT32, NTFS, ext4, ext3, ext2, XFS and Btrfs. Disks are mounted under /mnt/cloudzh/<name> without the right to run programs.
zh disk                     # list with numbers
zh disk mount 1
zh disk eject 1
Backups & updates
Keep CloudZH current with one button and keep a copy of your settings.
Updating CloudZH
When an update is available it appears under Needs attention. Click Update, or on the server:
The update runs as its own service. The dashboard reloads after 60 seconds and keeps your page. Settings → Updates shows whether updates are set up on this server and which channel it follows (Stable or Experimental).
Updating from an archive
Got a new version as an installer archive? Copy it to the server like the first installer (<file> is its file name), unpack it into a new folder and upgrade from there:
rm -rf ~/cloudzh-new && mkdir ~/cloudzh-new
tar xzf ~/<file> -C ~/cloudzh-new --strip-components=1
zh upgrade ~/cloudzh-new
Users, apps, settings and keys stay as they are.
Updating apps
Each app page has Update for its image. Image updates stay possible in restricted licence mode, because security fixes for your apps should never wait for an invoice.
Backups
Operations → Backups creates a backup of CloudZH and app settings. On the server:
Keep a copy elsewhereA backup on the same disk does not survive that disk. Download it or copy it to another machine. Your media library is not part of the backup. Backups open only with the backup key from the installation (sudo cat /etc/cloudzh/backup.key); keep it in your password manager.
AI assistant
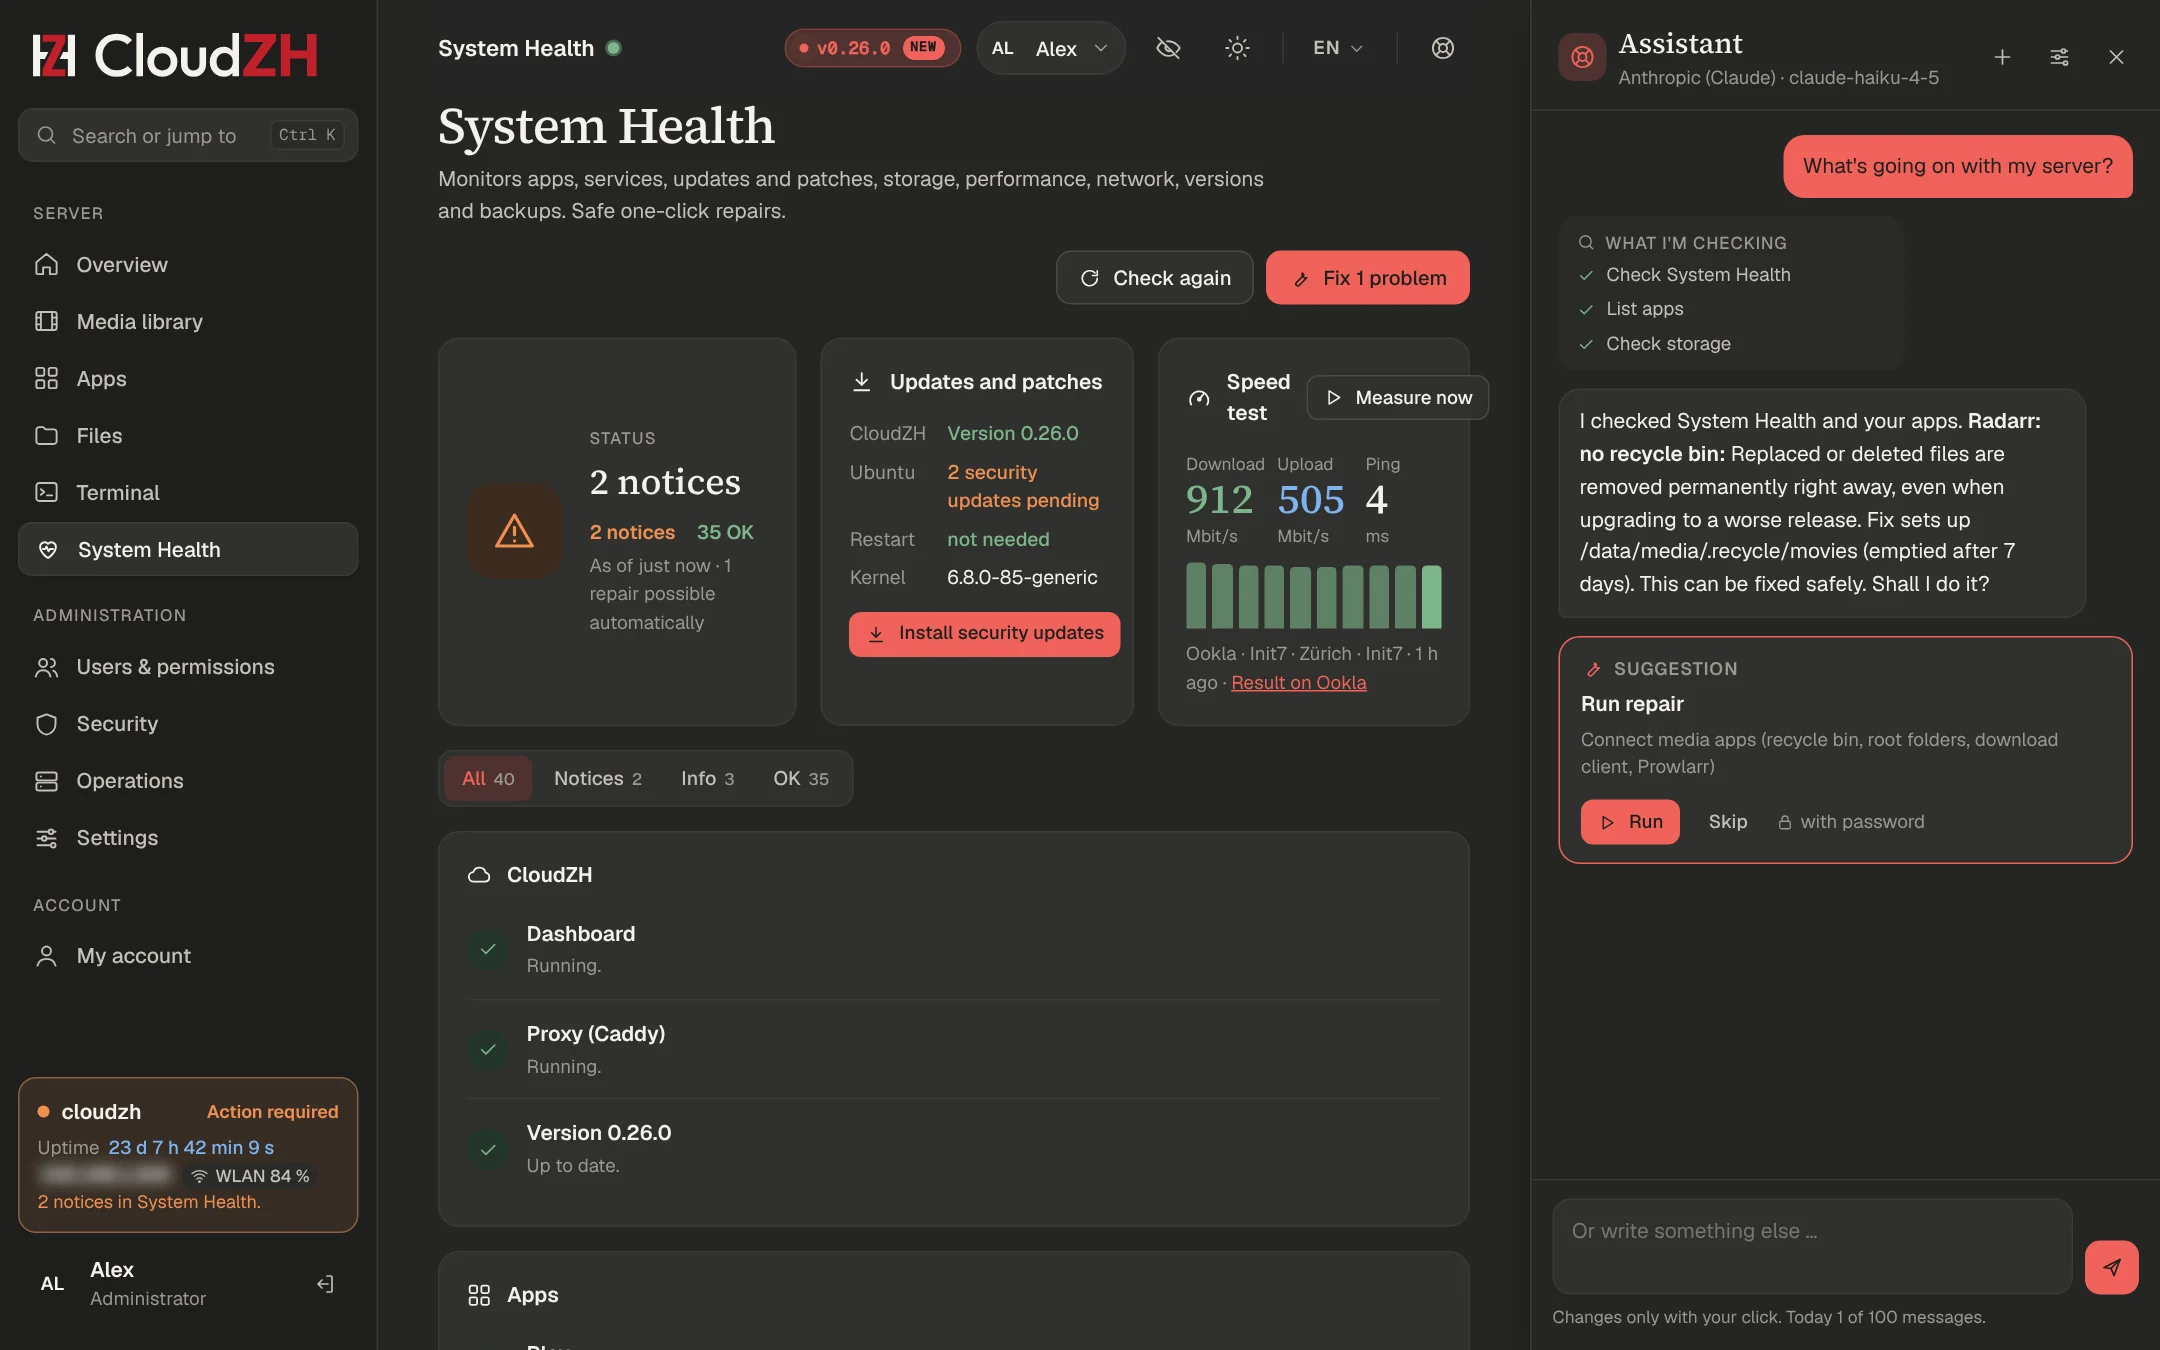
Ask what is wrong. The assistant checks, explains and proposes one fix that only runs after your click.
Set up
- Click the life ring top right (administrators only), then the gear.
- Choose a provider: Anthropic, OpenAI, Google Gemini, OpenRouter, or your own endpoint such as Ollama.
- Paste your API key, click Test connection, pick a model and save with your password.
A small model is enough. With Claude Haiku 4.5 a support conversation costs a few US cents on your own key.
What it can do
| Read | Act, after your click | Never |
|---|
| Server state, System Health, apps and logs, storage, downloads, missing titles, backups, CloudZH docs | Start, restart or update an app, install a simple app, run an offered repair, backup, speed test, connect apps, search in Radarr and Sonarr | Shell, files, configuration, secrets, users, security, VPN, CloudZH update, licence, removing, restoring |
Your data
- API keys, passwords, tokens and keys in URLs are removed before a message leaves the server.
- Your key is stored encrypted; the browser only sees the last four characters.
- Default limits: 100 requests per day, 1500 per month.
zh ai status
zh ai off          # the dashboard cannot turn it back on
zh ai forget-key
VPN (WireGuard)
Reach the dashboard, the admin apps and your home network from anywhere, without opening more ports.
Set up
Forward UDP 51820 in your router to the server.
Check DNS. vpn.example.com (with your domain) must point straight to your public IP. The Cloudflare proxy does not carry WireGuard.
Add a device. Give it a name and scan the QR code with the WireGuard app on your phone.
Lock down admin access. Security → access rules: Admin only from home network or VPN.
How it runs
WireGuard runs in the Linux kernel as wg-quick@wg0, not in a container. Installing and removing it is only possible on the server. The dashboard shows the QR code and the configuration of new devices.
Coming nextDevice list with online status and data volume, block and unblock, access profiles per device (only CloudZH, home network, everything) and guest devices with an end date.
UniFi OS Server
Run the UniFi Network application for your access points and switches on the CloudZH server.
Install
UniFi OS Server runs rootless with Podman under its own user. Open it at https://unifi.example.com behind your login, or at home on https://<server-ip>:11443, for example https://192.168.1.200:11443.
Inform address
Your UniFi devices report to the address in Inform host override. CloudZH enters the cable address of the server there by itself and checks it at every start and every 6 hours, so devices never report to a Wi-Fi or container address. Show or change it on the server:
zh unifi inform              # show
zh unifi inform <server-ip>   # a fixed address instead
zh unifi inform auto         # back to automatic
Moving from another controller
A device obeys one controller only. Keep exactly one active.
Create a backup in the old controller (Network → Settings → System → Backups) and restore it in the Network app on CloudZH.
Check the inform address with zh unifi inform.
Point each device to the new controller over SSH.
<device-ip> is the address of the access point or switch,
<server-ip> that of the server:
ssh admin@<device-ip>
set-inform http://<server-ip>:8080/inform
The SSH session drops while the device provisions. That is normal.
Check with info on the device: Connected (http://<server-ip>:8080/inform). Then stop the old controller.
Connect the server by cableIf the server reaches your network through the access point it manages, a firmware update or a wrong setting cuts it off from itself. Turn off automatic device updates while the server is on Wi-Fi.
UniFi OS Server supports the Network application. Protect, Access and Talk need a UniFi console.
Network tips
A stable cable connection matters more for a home server than anything in the dashboard.
Cable first, Wi-Fi as standby
Give the cable the fixed address everything points to, and keep Wi-Fi as a fallback with a second address. Example for Netplan in /etc/netplan/01-cloudzh.yaml, with 192.168.1.200 as <server-ip>, 192.168.1.1 as the router and the adapter names from ip -br link. Use your own values:
network:
  version: 2
  renderer: networkd
  ethernets:
    enp3s0f0:
      dhcp4: false
      addresses: [192.168.1.200/24]
      routes: [{ to: default, via: 192.168.1.1, metric: 100 }]
      nameservers: { addresses: [192.168.1.1] }
  wifis:
    wlp2s0:
      optional: true
      dhcp4: false
      addresses: [192.168.1.201/24]
      routes: [{ to: default, via: 192.168.1.1, metric: 600 }]
      nameservers: { addresses: [192.168.1.1] }
      access-points:
        "YourWiFi": { password: "…" }
Apply it safely with sudo netplan try --timeout 300, so a mistake rolls back by itself. With two interfaces in one network, also set:
# /etc/sysctl.d/60-cloudzh-dualnic.conf
net.ipv4.conf.all.arp_ignore = 1
net.ipv4.conf.all.arp_announce = 2
Why not both at once
Bonding cable and Wi-Fi does not work cleanly with a Wi-Fi client, and a single download always uses one path. Your internet line is the limit, not the LAN.
Router
- Reserve the address of the server in the router.
- Forward TCP 443 (dashboard, apps, Plex) and UDP 51820 (VPN). Plex needs TCP only.
zh command reference
Run zh on the server as any user with sudo rights. It asks for rights when a command needs them.
| Command | What it does |
|---|
zh | Clears the console |
zh menu | Opens the menu with all areas, six languages (key L) |
zh help | Lists all commands |
zh status | Short status of server, apps, health and licence |
zh doctor [--fix] [--apt] | Runs System Health, optionally with safe repairs and package repairs |
zh speedtest | Measures your internet line |
zh diagkit install | Completes the diagnostics kit |
zh apps | Lists installed apps |
zh apps wire | Connects the apps with each other |
zh apps tune | Applies the TRaSH recommendations |
zh update | Updates CloudZH |
zh upgrade <folder> | Installs a new version from an unpacked installer archive |
zh backup | Creates a backup |
zh perf [--live] [--fix] | Performance diagnosis, live view, relieve SABnzbd |
zh reboot [--in <min>] [--cancel] [--status] | Restarts now or later |
zh poweroff [--in <min>] | Shuts down now or later |
zh vpn install · zh vpn add <name> | Installs WireGuard, adds a device with QR code |
zh unifi install · zh unifi inform | Installs UniFi OS Server, shows or sets the inform address |
zh token | Shows the setup token for the first sign-in |
zh users | Lists dashboard users |
zh rename-user <old> <new> | Renames a user |
zh enable-user <name> | Reactivates a user, also removes an end date |
zh reset-password <name> | Sets a new password |
zh reset-2fa <name> | Removes the second factor of a user |
zh terminal status|on|off | Browser terminal; also remote on|off, user <name>, close-all |
zh files off | Turns off the file manager |
zh disk · zh disk mount|unmount|eject <n> | Lists USB disks, mounts or ejects one |
zh website status|build|deploy|on|off | Serves a static website on your main domain, see Domain & HTTPS |
zh ai status|on|off|forget-key | Controls the assistant; only root can lift a block |
zh license | Shows the licence of this server |
zh license activate · zh license refresh | Activates a licence, fetches a fresh licence file |
zh license release | Releases this server, its seat becomes free |
zh support | Discord community, documentation and feedback |
Language
Messages follow the language you chose in the dashboard. Override it for one command with CZH_LANG=de zh status. Questions show a single letter in your language, for example (y/n), (j/n) or (o/n). One letter is enough, the full word works too; y, yes, n and no always work.
What's new
The highlights of the latest versions. Administrators find the full release notes in the dashboard, behind the version badge at the top. Current version: 0.35.0.
0.32
- Your account at account.cloudzh.app: licences and servers, installation keys, redeem codes, buy a subscription, invoices and support requests, with passkeys and two-factor sign-in. See the Customer guide.
- Keys always come by email from the licence service; the account never shows them.
- Support requests also without an account, at account.cloudzh.app/support.
0.31
- Consoles for installs, updates and repairs speak your dashboard language.
- UniFi OS Server: the inform address is set automatically (
zh unifi inform). - System Health warns when the server uses Wi-Fi although a cable is connected.
- Speed test with Cloudflare by default, Ookla only on request.
0.30
- Licences arrive by email automatically after a purchase, with one installation key per server.
0.28
- UniFi OS Server: signing in with the UI account keeps working, checked every 6 hours.
0.27
- Activity page: who watches what on Plex, who is online, history.
- Update channels Stable and Experimental under Settings → Updates.
- Help and feedback in the dashboard, with Discord, feature requests and bug reports.
- Change the SSH port safely with
zh ssh-port.
0.26
- A product film on this site: every area in about four and a half minutes, with chapters.
- Format disks under Files → Drives: ext4 or exFAT, with two confirmations and a live console.
- exFAT, XFS, Btrfs and NTFS disks mount reliably on hardened servers.
0.25
- Profile pictures for every account, cropped and zoomed in the browser.
- A longer start screen: the monogram builds up, the CloudZH wordmark slides in.
0.24
- External drives in the file manager: mount, unmount, safely remove, mount automatically, read only.
- Copy and move between your data and USB disks;
zh disk on the server.
0.23
- Loading animations in the accent colour: start screen, page bar, skeletons instead of empty pages.
0.22
- The overview became a widget grid: drag, resize, add and remove widgets, a layout per user, defaults for admins and friends.
- Release notes in your language.
0.21
- IP, MAC and e-mail addresses blurred until you click them, an eye button to reveal all.
- The installed version as a badge at the top, with a hint after each update.
Data layout
One data tree for all apps, laid out as the TRaSH Guides recommend, so moves are instant and files are not stored twice.
/srv/data
├── usenet
│   ├── incomplete          # SABnzbd working folder
│   └── complete
│       ├── movies · tv · audio
│       └── prowlarr        # manual grabs from the indexer search
└── media
    ├── movies · tv · music
    └── .recycle            # recycle bin of Radarr, Sonarr, Lidarr, 7 days
What each app sees
| App | Mounted as |
|---|
| Sonarr, Radarr, Lidarr | /data (all of it) |
| SABnzbd | /data/usenet |
| Plex, Bazarr | /data/media |
Other places
| Path | Contains |
|---|
/opt/cloudzh/apps/<app> | Compose file and configuration of each app |
/etc/cloudzh | Server settings, licence file |
Apps write as the user cloudzh. If an app reports "Permission denied", use Files → Repair permissions.
Security model
Who can do what, where the boundaries are, and what CloudZH does not protect against.
Layers
| Layer | Protection |
|---|
| Entry | Caddy as the only door, HTTPS everywhere, admin apps behind the dashboard login, session cookie removed before requests reach an app |
| Sign-in | Password policy, passkeys, authenticator codes with recovery codes, lockout after failed attempts, devices list with sign-out |
| Rules | Admin only from home network or VPN, 2FA required, password confirmation for sensitive actions |
| Dashboard | No privileges, hardened container, no third-party packages |
| Agent | Fixed command list over a Unix socket, systemd hardening, paths checked without following symlinks, audit log |
| Server | System software only from the command line, Fail2Ban on logins, security updates by button |
Secrets
- Invite links and licence keys are stored only as hashes.
- AI keys are stored encrypted, the browser sees the last four characters.
- Your Plex account token stays in memory during setup only.
- Admin apps get their API keys from their own config files; keys are never sent to the browser.
Limits
Whoever has root on the server can read and change everything, including CloudZH. Two apps, Lingarr and Requestrr, run without their own login and are reachable by other containers on the Docker network; from outside they sit behind the dashboard login like every admin app.
Licensing
One licence per server, monthly or yearly, as Standard or Pro; the Household plan covers up to 3 servers. Manage it in your account at account.cloudzh.app.
Buying
Buy in your account at account.cloudzh.app under Buy, or under Pricing on this website. Choose monthly or yearly and the number of servers. Payment is handled by Link (Sold through Link, LLC, a Stripe company) as merchant of record. Your licence key and installation key arrive by email automatically, usually within minutes. Trial and gift codes are redeemed in your account under Redeem code. Step by step: Get a licence. See the Terms and the Refund Policy.
Standard and Pro
| Area | Standard | Pro |
|---|
| Apps, media library, setup assistants, TRaSH | All | All |
| Security: 2FA, passkeys, VPN, firewall, new-device alerts | All | All |
| Dashboard accounts | One, for you (Plex and Jellyfin sharing works as usual) | Accounts for family and friends, invite links, guest accounts that expire, more admins |
| Backups and updates with rollback | Local, encrypted | Plus off-site, download in the browser, automatic updates, app rollback |
| Notifications | One channel, default thresholds | All channels, own thresholds, quiet hours |
| Activity history, performance diagnosis, AI assistant, custom apps, homelab extras | – | Included |
| Look | Light or dark, density, language, formats | Plus own name, logo, colours, sign-in page and menu names |
| Support | Discord and tickets | Tickets answered first |
A free trial always has the Pro features. Moving from Pro to Standard never deletes anything: accounts and settings stay, only new Pro features pause until you switch back.
Keys
| Key | Format | Use |
|---|
| Licence key | CZL-XXXXX-XXXXX-XXXXX-XXXXX | Your contract. Keep it safe. |
| Installation key | CZI-XXXXX-XXXXX-XXXXX | Activates one server, once. Valid 30 days from a purchase, 7 days when you create it in your account. |
Two keys mean that a licence key seen on a screenshot cannot activate another server. Keys only come by email and are never shown again. In your account, My licences creates a new installation key or reissues a lost licence key; see Your licence email.
Check-in
The server checks in once a day and receives a signed licence file. It sends its server ID, the CloudZH version and a hardware fingerprint.
States
| State | Effect |
|---|
| Active, ends soon | Everything works, reminder 14 days before |
| Grace period | 7 days after the end, everything works, banner |
| No contact to the licence service | Normal for 14 days, banner after 3 missed check-ins |
| Expired, paused, revoked, not activated | Restricted mode |
Restricted mode
Paused: CloudZH updates, new apps, new users and invite links. Keeps working: Plex, all installed apps, VPN, backups, sign-in, app image updates, restoring backups, security updates, terminal and files.
New hardware
One licence counts one active server. To move, release the old server (My licences in your account, zh license release, or My account → Subscription in the dashboard), create a new installation key in your account and activate the new server with it. Details: Move or reinstall.
When the hardware changes without a release, the server keeps running and shows Hardware changed. If two machines use the same licence, only one keeps it.
zh license            # licence of this server
zh license activate   # activate with licence and installation key
zh license refresh    # check in with the licence service now
zh license release    # free the seat of this server
Troubleshooting
The problems we have seen on real servers, and what fixes them.
SABnzbd: "Aborted, cannot be completed"
The release is incomplete: articles are missing on the Usenet server, often on older releases after takedown requests. Retrying does not help. Delete the entry; Radarr marks the release as failed and searches another. If it happens often, add a second provider on a different backbone with lower priority, and more indexers in Prowlarr.
Radarr: "Manual import required"
The release was matched by ID, but its title does not match the film, which is common with German titles. Use Import in the Downloads tab, check the file and confirm.
A good video file was replaced by a disc image
System Health → Media library lists disc images and titles without the CloudZH profile. Mark the grab as failed in Radarr, apply the quality preset to all titles and search again. Since the recycle bin is set up, replaced files stay 7 days in /srv/data/media/.recycle.
The dashboard is slow during downloads
Run Operations → Performance while the download runs. Usual causes: SABnzbd with too many connections (use Relieve SABnzbd), a full internet line, or the route through your router (add the hosts entry from Domain & HTTPS).
UniFi sign-in: "check for any issues with your ISP"
The message is misleading. UniFi OS checks for a time service inside its container, which the image does not have, even though the clock is correct. CloudZH adds a placeholder for it and checks it at every start of UniFi OS Server and every 6 hours, also after a UniFi OS Server update. If the message still shows, use the repair button at UniFi OS Server: time check in System Health under Versions, or run:
Sonarr or Radarr: "Permission denied"
Files → select the folder → Repair permissions.
A service shows as failed
Self-healing restarts it within a few minutes. If it shows as failed for longer, use the repair button in System Health, or zh doctor --fix.
Getting help
Most answers are one click away. When they are not, send the right details.
Start here
- System Health: does it show a problem with a repair button?
- The assistant: ask what is wrong, it reads the checks and logs for you.
- This documentation: press Ctrl K and search.
Contact
- Support request: in your account at account.cloudzh.app under My requests → New request, with up to 3 attachments. Without an account: account.cloudzh.app/support, then confirm the request with the link in the email.
- Community: Discord, or Help and feedback (speech bubble at the top right) in the dashboard.
- Email: support@cloudzh.app
Include:
- CloudZH version and server (
zh status) - Output of
zh doctor - The text of the console or error, copied
- What you did and what you expected
Before you sendRemove API keys, passwords, licence keys and your public IP address from logs and screenshots.
Imprint
Responsible for this website.
E-mail: support@cloudzh.app
Liability
We check the content of this website carefully but cannot guarantee that it is complete, correct or current. Links to other websites are outside our responsibility.
Trademarks
Plex, Jellyfin, UniFi, WireGuard and all other product names belong to their owners. CloudZH is not affiliated with them.
Privacy
This website sets no cookies, uses no analytics and loads nothing from other servers. The full Privacy Policy covers purchases and the licence service in detail.
This website
- No cookies, no tracking, no analytics, no advertising.
- Fonts, images and videos are delivered from this server. No requests go to Google or other third parties.
- We keep no access logs. The server processes your IP address only to deliver the page and protect it against attacks.
- If you write to us, we use your message only to answer it.
- Purchases run on checkout pages of Link (Sold through Link, LLC, a Stripe company), which sells the licence as merchant of record and handles payment, invoices and taxes.
CloudZH on your server
Your server checks in with the licence service once a day with its server ID, instance key, hostname, CloudZH version, a hardware fingerprint and the number of users, administrators and installed apps (numbers only). Media, file names, user names, passwords and settings stay on your server. The assistant sends data only to the AI provider you configure, with your own key, after removing secrets.
Your rights
You can ask what we store about you, and have it corrected or deleted, at support@cloudzh.app. This statement follows the Swiss Federal Act on Data Protection (FADP) and, where it applies, the EU GDPR. All recipients and transfers abroad are listed in the full Privacy Policy.